Prerequisites
- Active AWS account with billing data access
- Cost and Usage Report (CUR) configured and published to S3
- AWS credentials with appropriate permissions
- S3 bucket containing CUR files
- Optionally: Identity and Access Management (IAM) role for cross-account access
Setting up cost and usage reports
1. Enable cost and usage reports
- Sign in to the AWS Management Console
- In the search bar at the top, type “Cost and Usage Reports” and select it from the dropdown
- Alternatively, you can find it under Billing and Cost Management in the services menu
- Or navigate to Billing dashboard > Data Exports in the left sidebar
- In the Billing and Cost Management console, click Data Exports tab
- Click Create export
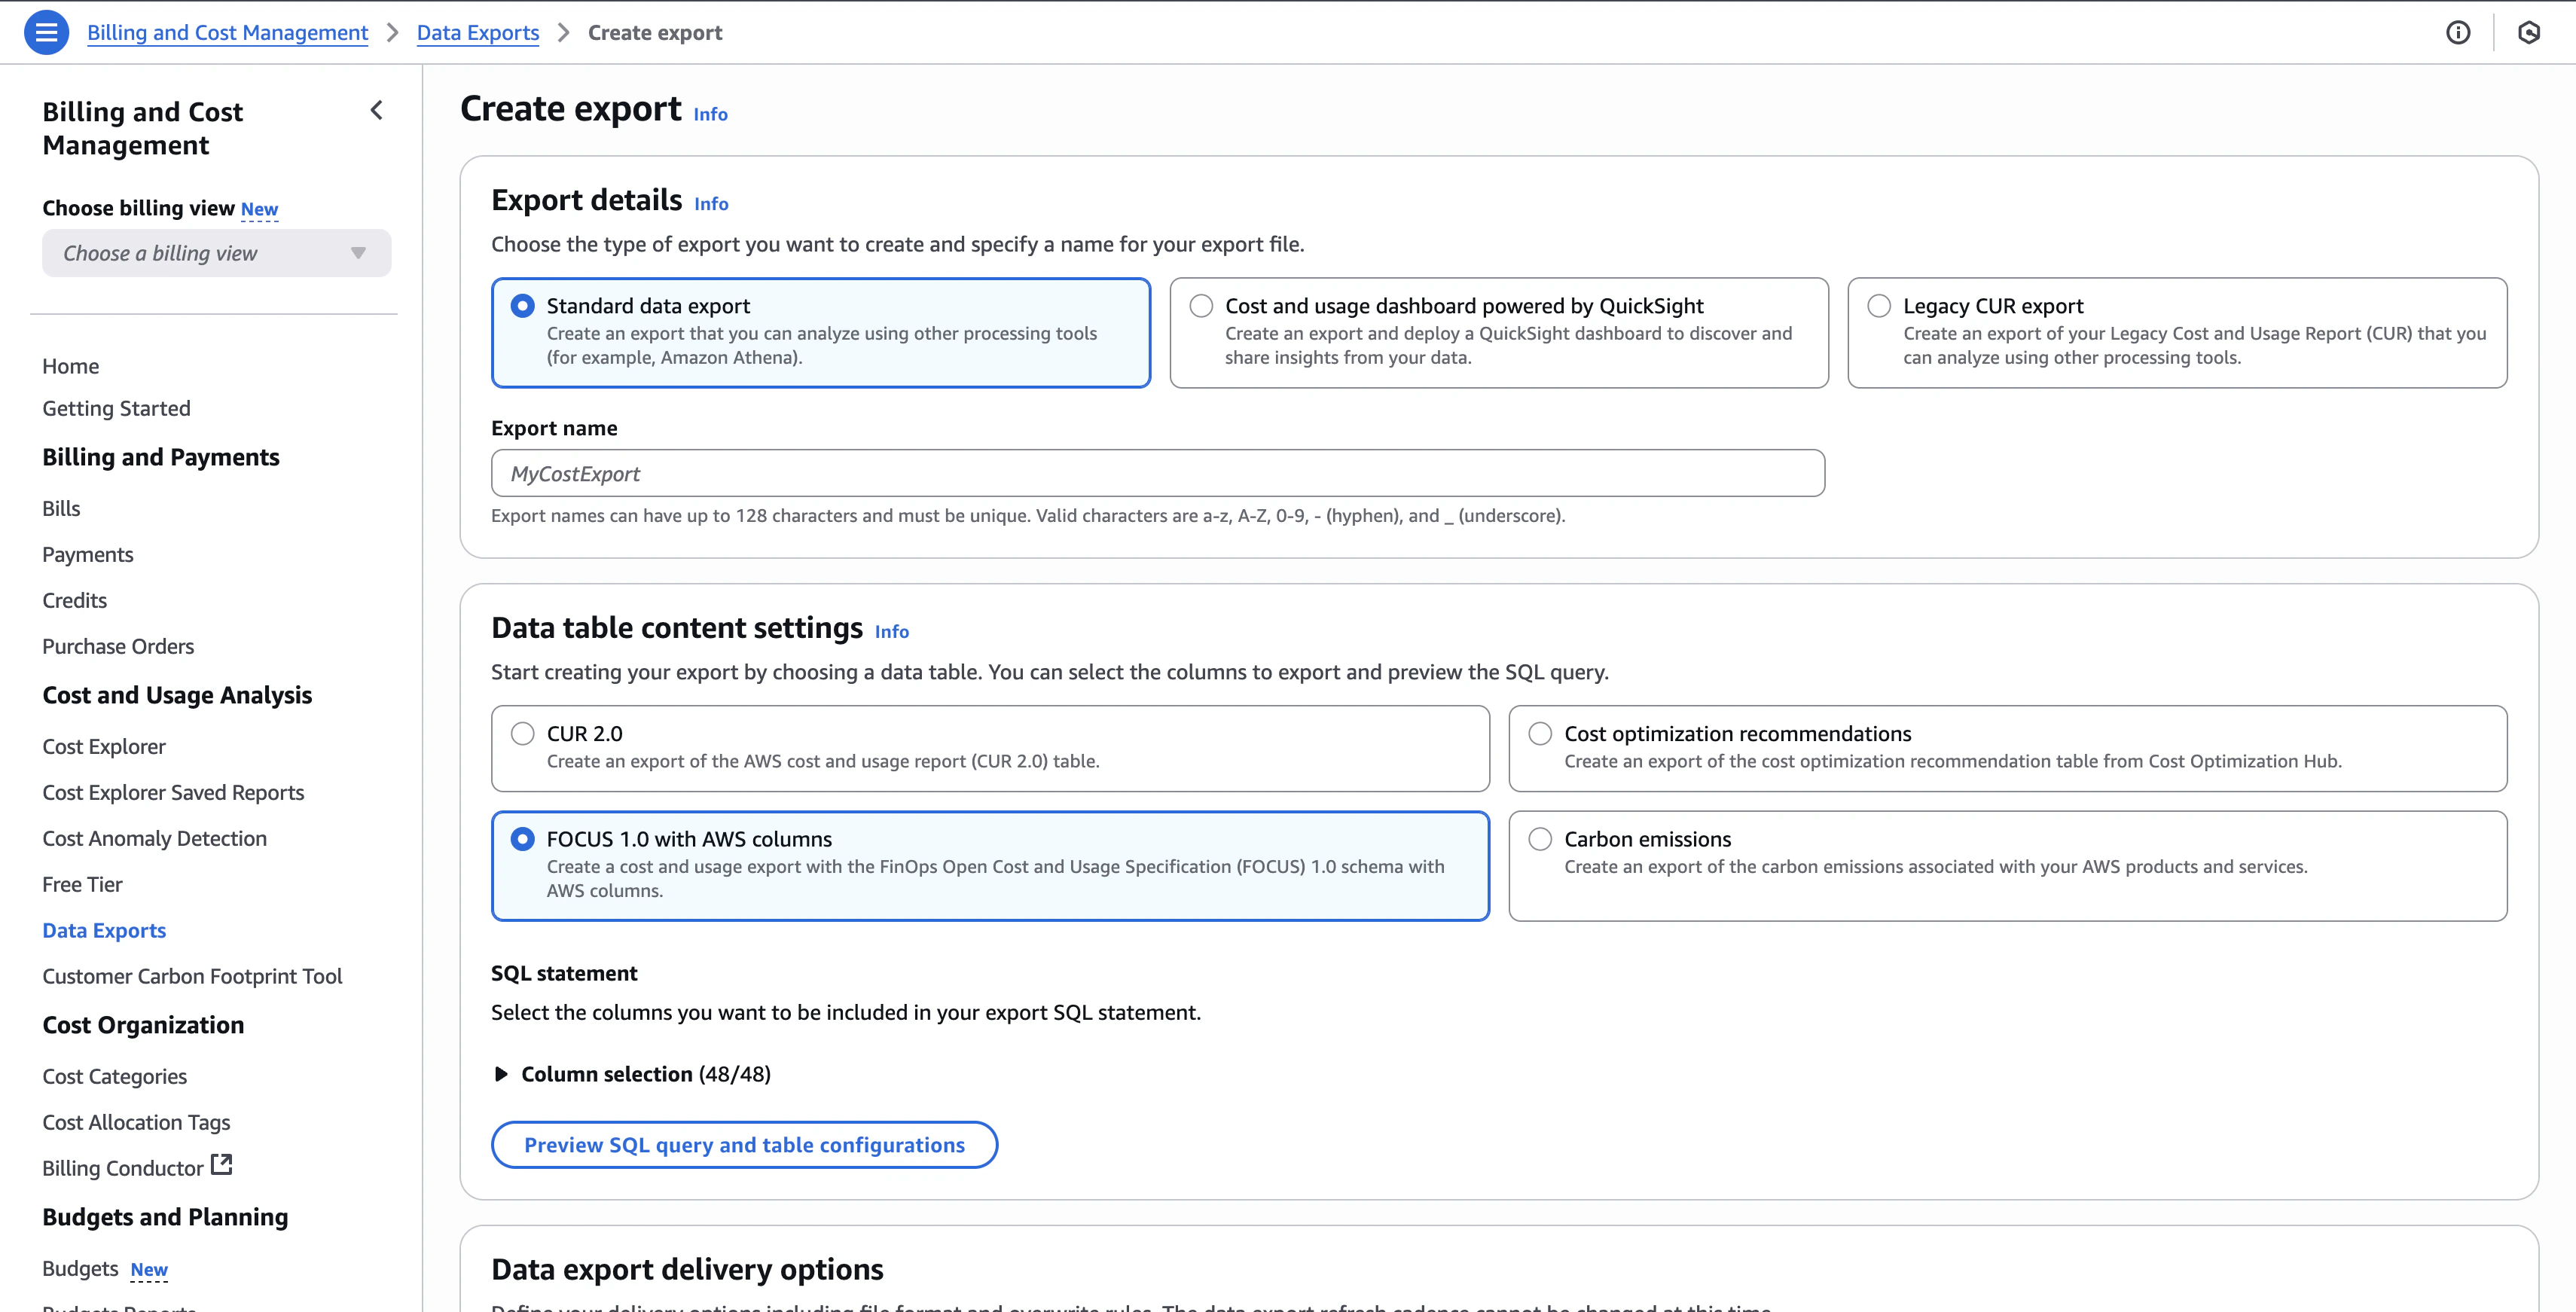
2. Configure export details
-
Choose Export Type:
- Select Standard data export (recommended for NarevAI integration)
- Alternatively, you can choose Legacy CUR export for compatibility with older systems
-
Export Name:
- Enter a descriptive name (for example,
MyCostExport,NarevAI-Export) - Export names can have up to 128 characters and must be unique
- Valid characters are a-z, A-Z, 0-9, - (hyphen), and _ (underscore)
- Enter a descriptive name (for example,
3. Data table content settings
Select FOCUS 1.0 with AWS columns - this is the format NarevAI optimizes for:- FOCUS 1.0 with AWS columns ✅ (Required)
- Standardized FinOps cost data format
- Includes AWS-specific metadata for detailed analysis
- Fully supported by NarevAI’s cost optimization engine
4. Data export delivery options
Configure how your export will be delivered: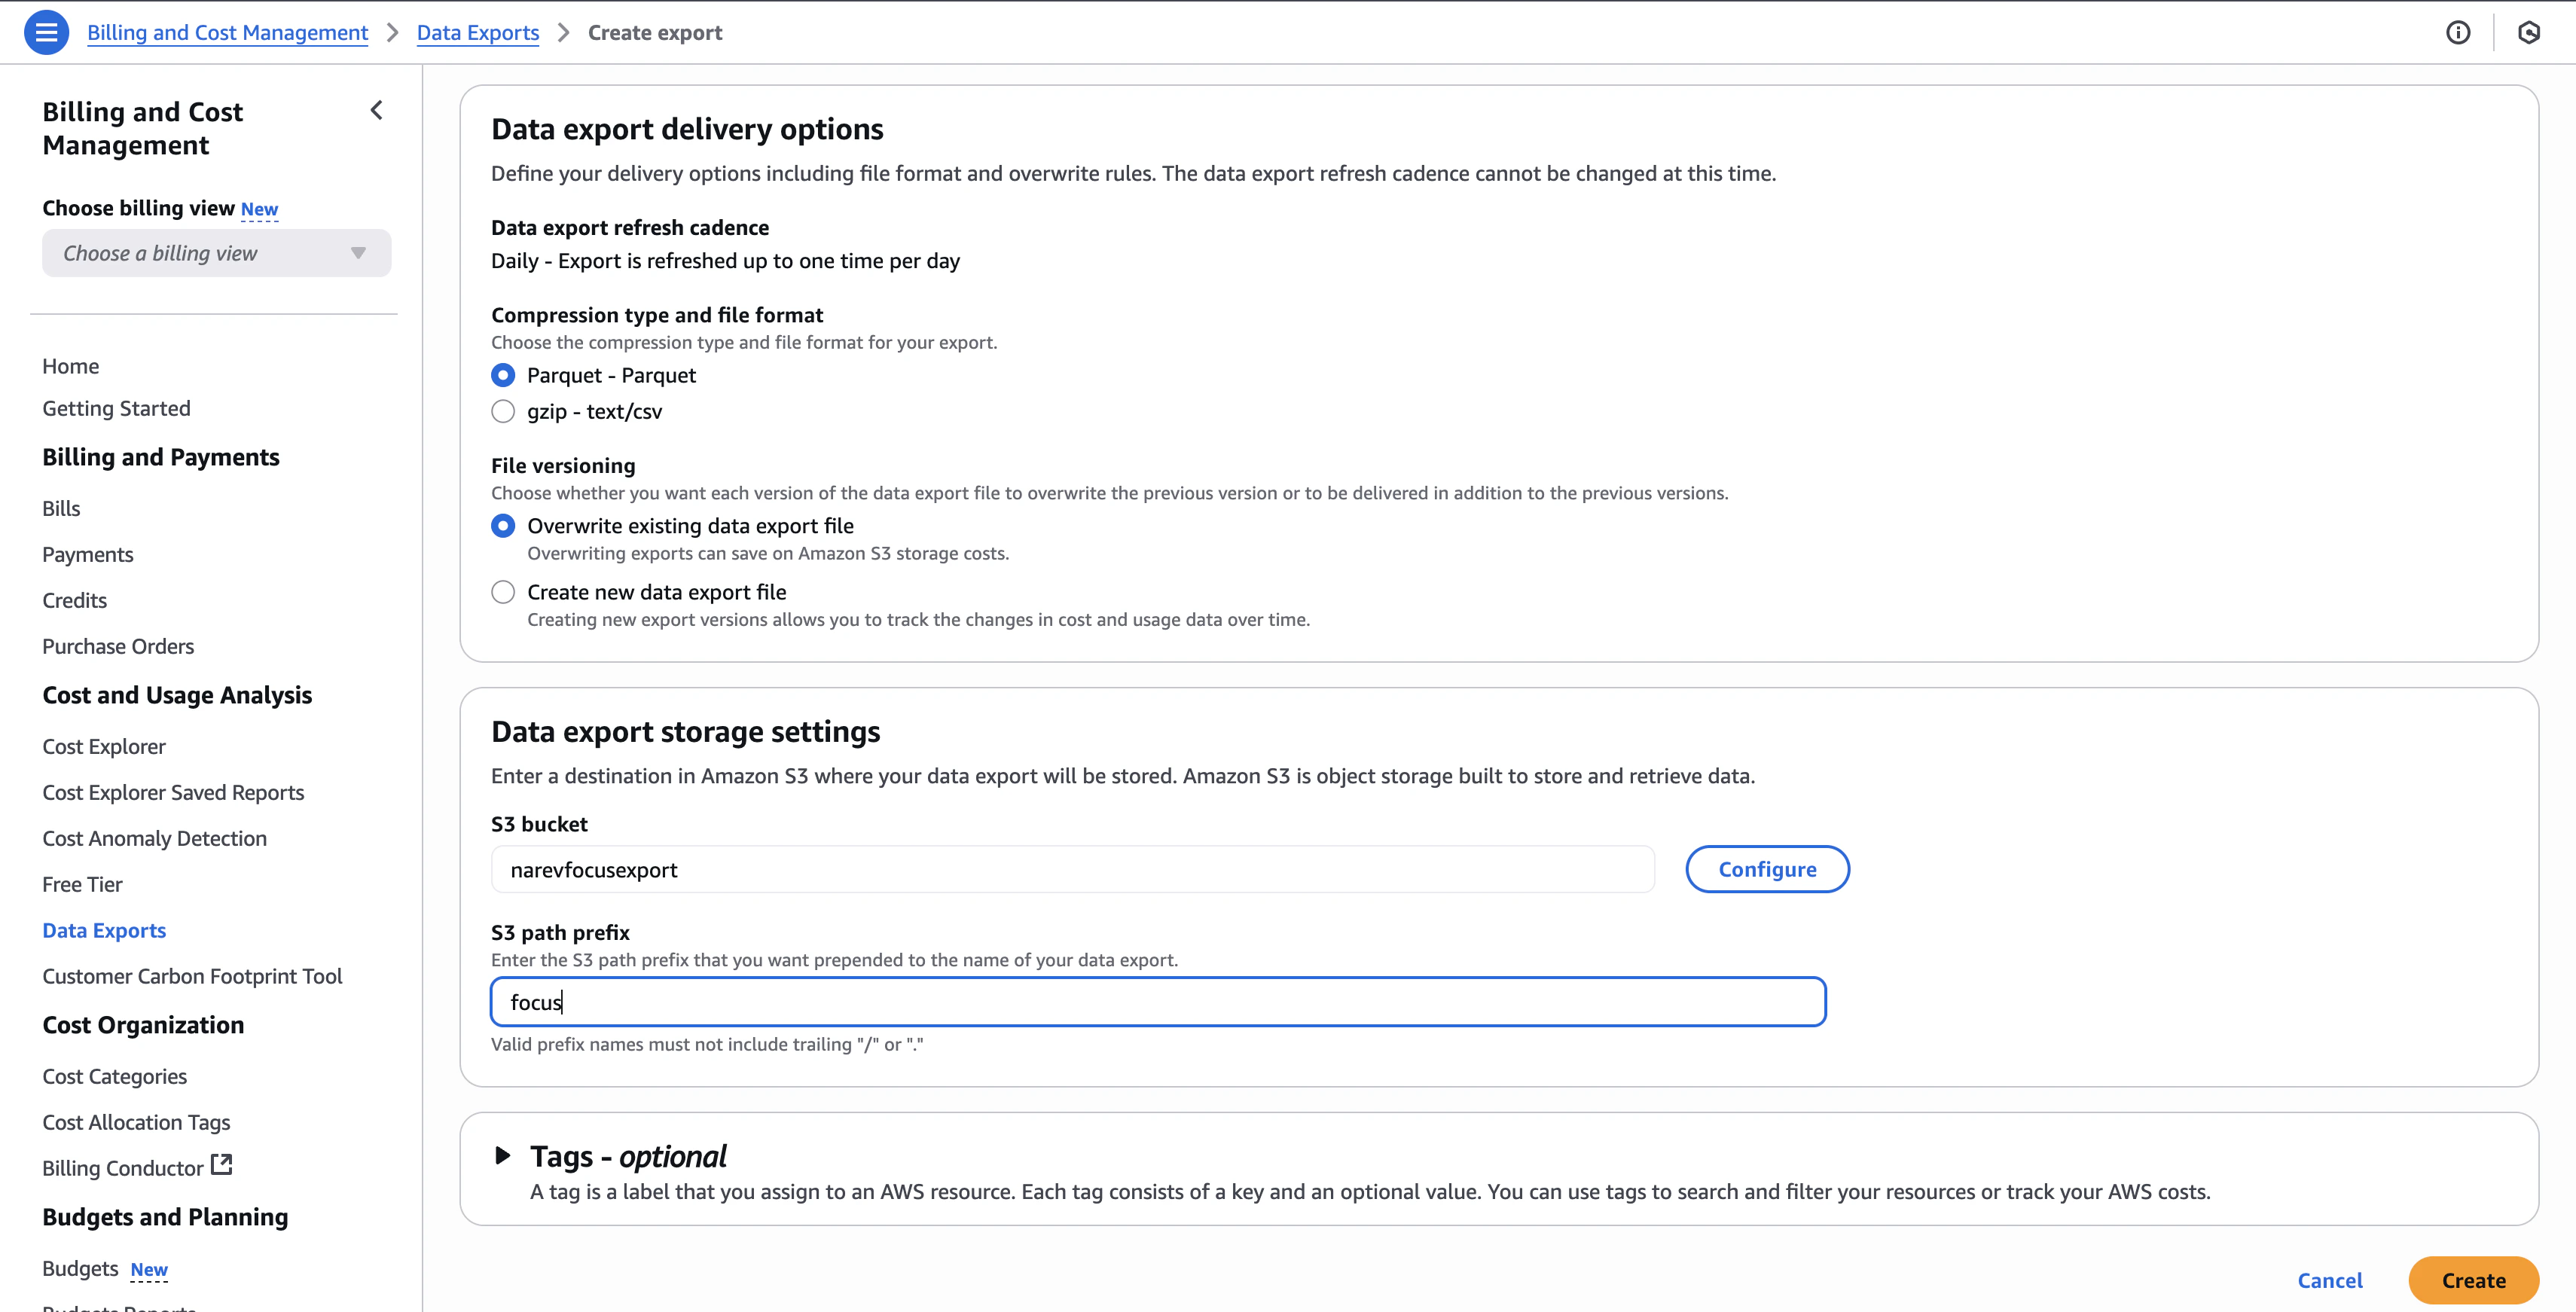
Compression type and file format
- Parquet - Parquet (recommended for better performance and smaller files)
- GZIP - text/csv (for compatibility with older systems)
File versioning
- Overwrite existing data export file - Saves on Amazon S3 storage costs (recommended)
- Create new data export file - Allows you to track changes in cost and usage data over time
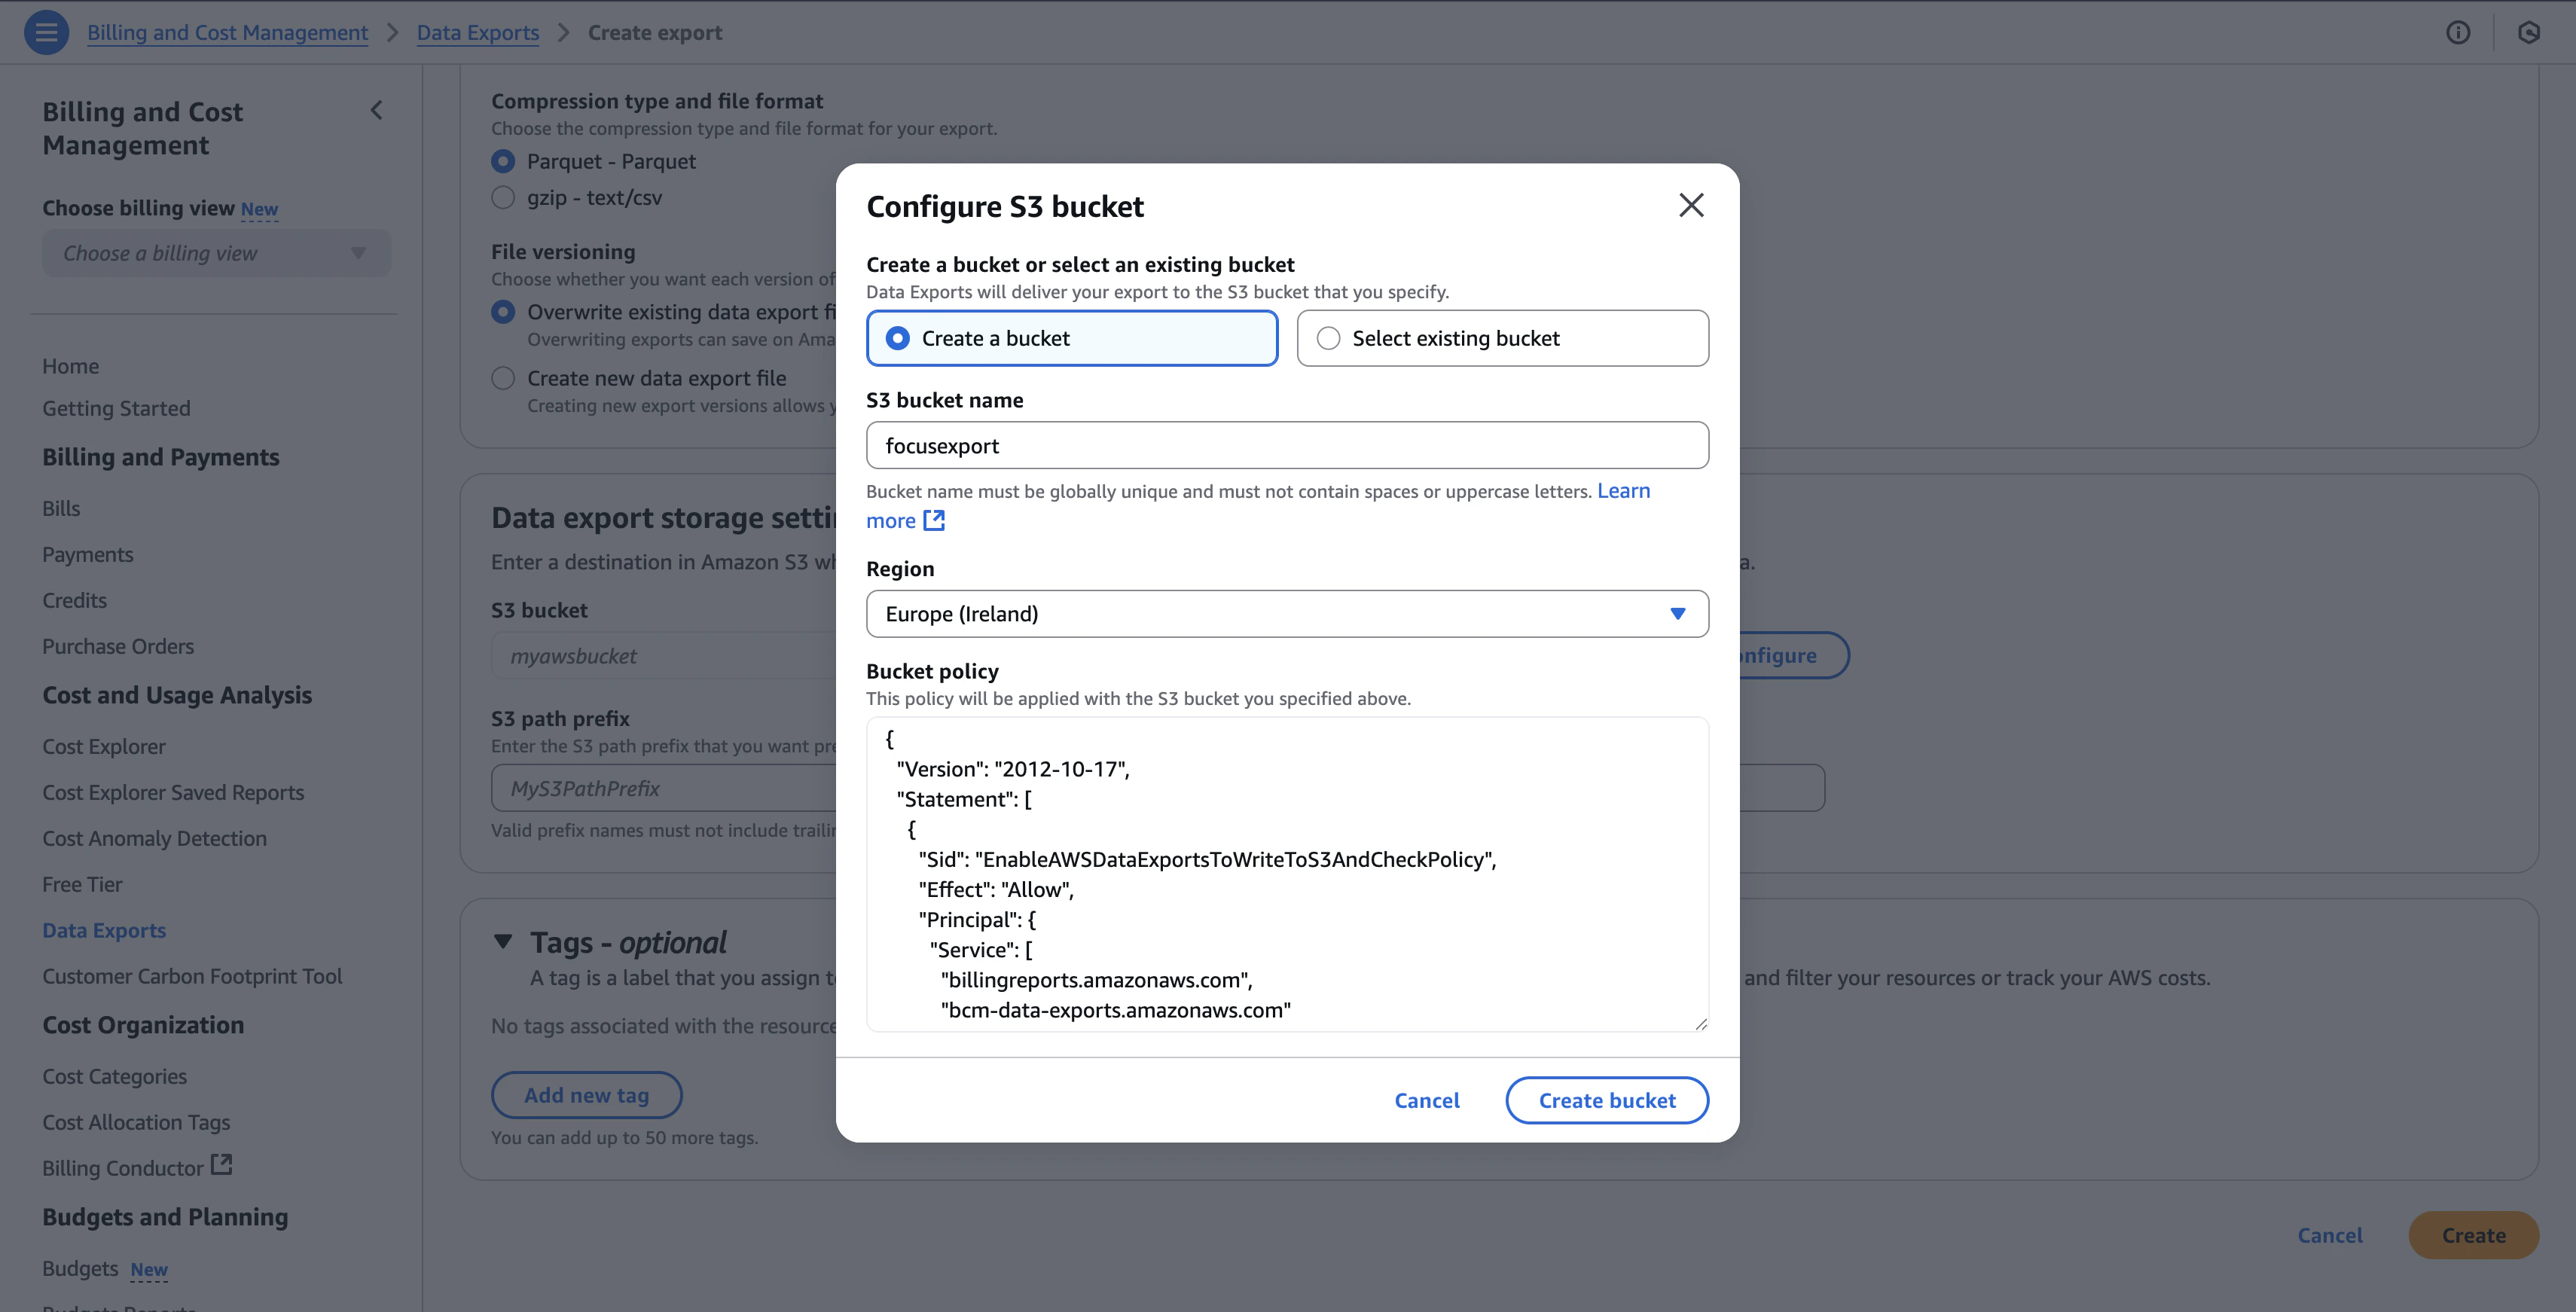
5. Configure S3 storage settings
S3 bucket configuration
- S3 Bucket:
- Click Configure to set up your S3 bucket
- You can either:
- Create a bucket - AWS creates a new bucket for you
- Select existing bucket - Choose from your existing S3 buckets
-
For New Buckets:
- S3 bucket name: Choose a globally unique name (for example,
company-focus-export) - Region: Select the region where you want to store your data
- Bucket policy: AWS automatically applies the necessary policy for Data Exports access
- S3 bucket name: Choose a globally unique name (for example,
-
S3 Path Prefix:
- Enter a prefix for organizing your exports (for example,
focus,cur,billing) - Valid prefix names must not include trailing ”/” or ”*“
- Enter a prefix for organizing your exports (for example,
Example configuration
6. Tags (Optional)
Add tags to help organize and track your AWS costs:- Each tag consists of a key and an optional value
- You can add up to 50 tags
- Use tags to search, filter, and track your AWS costs
AWS Credentials Setup
NarevAI requires AWS credentials to access your cost data. Here’s what you need:Required: Access Keys ✅
Always required - these are your basic AWS credentials:- In the AWS Console search bar, type “IAM” and select IAM from the dropdown
- In the IAM console, click Users in the left sidebar
- Select your user or create a new user for billing access
- Go to Security credentials tab
- Click Create access key
- Choose Application running outside AWS
- Save both the Access Key ID and Secret Access Key
Optional: IAM Role for Enhanced Security 🔒
Use when you need:- Cross-account access (bucket in different AWS account)
- Enhanced security (temporary credentials)
- Better auditing (role-based access logging)
- NarevAI logs in with your Access Keys
- Then assumes the IAM Role for actual data access
- Uses temporary credentials with limited permissions
- In IAM console, click Roles → Create role
- Select AWS account as trusted entity
- Enter the account ID that needs access
- Optionally, require an External ID for extra security
- Attach the same S3 permissions policy above
- Note the Role ARN for NarevAI configuration
- IAM Tutorial: Cross-Account Access with Roles
- AWS Billing IAM Permissions
- Cross-Account Resource Access
Adding AWS Provider in NarevAI
Step 1: Navigate to Connect
- In the NarevAI sidebar, under Data Connections, click Connect
- You’ll see the “Provider Integrations” page with available providers
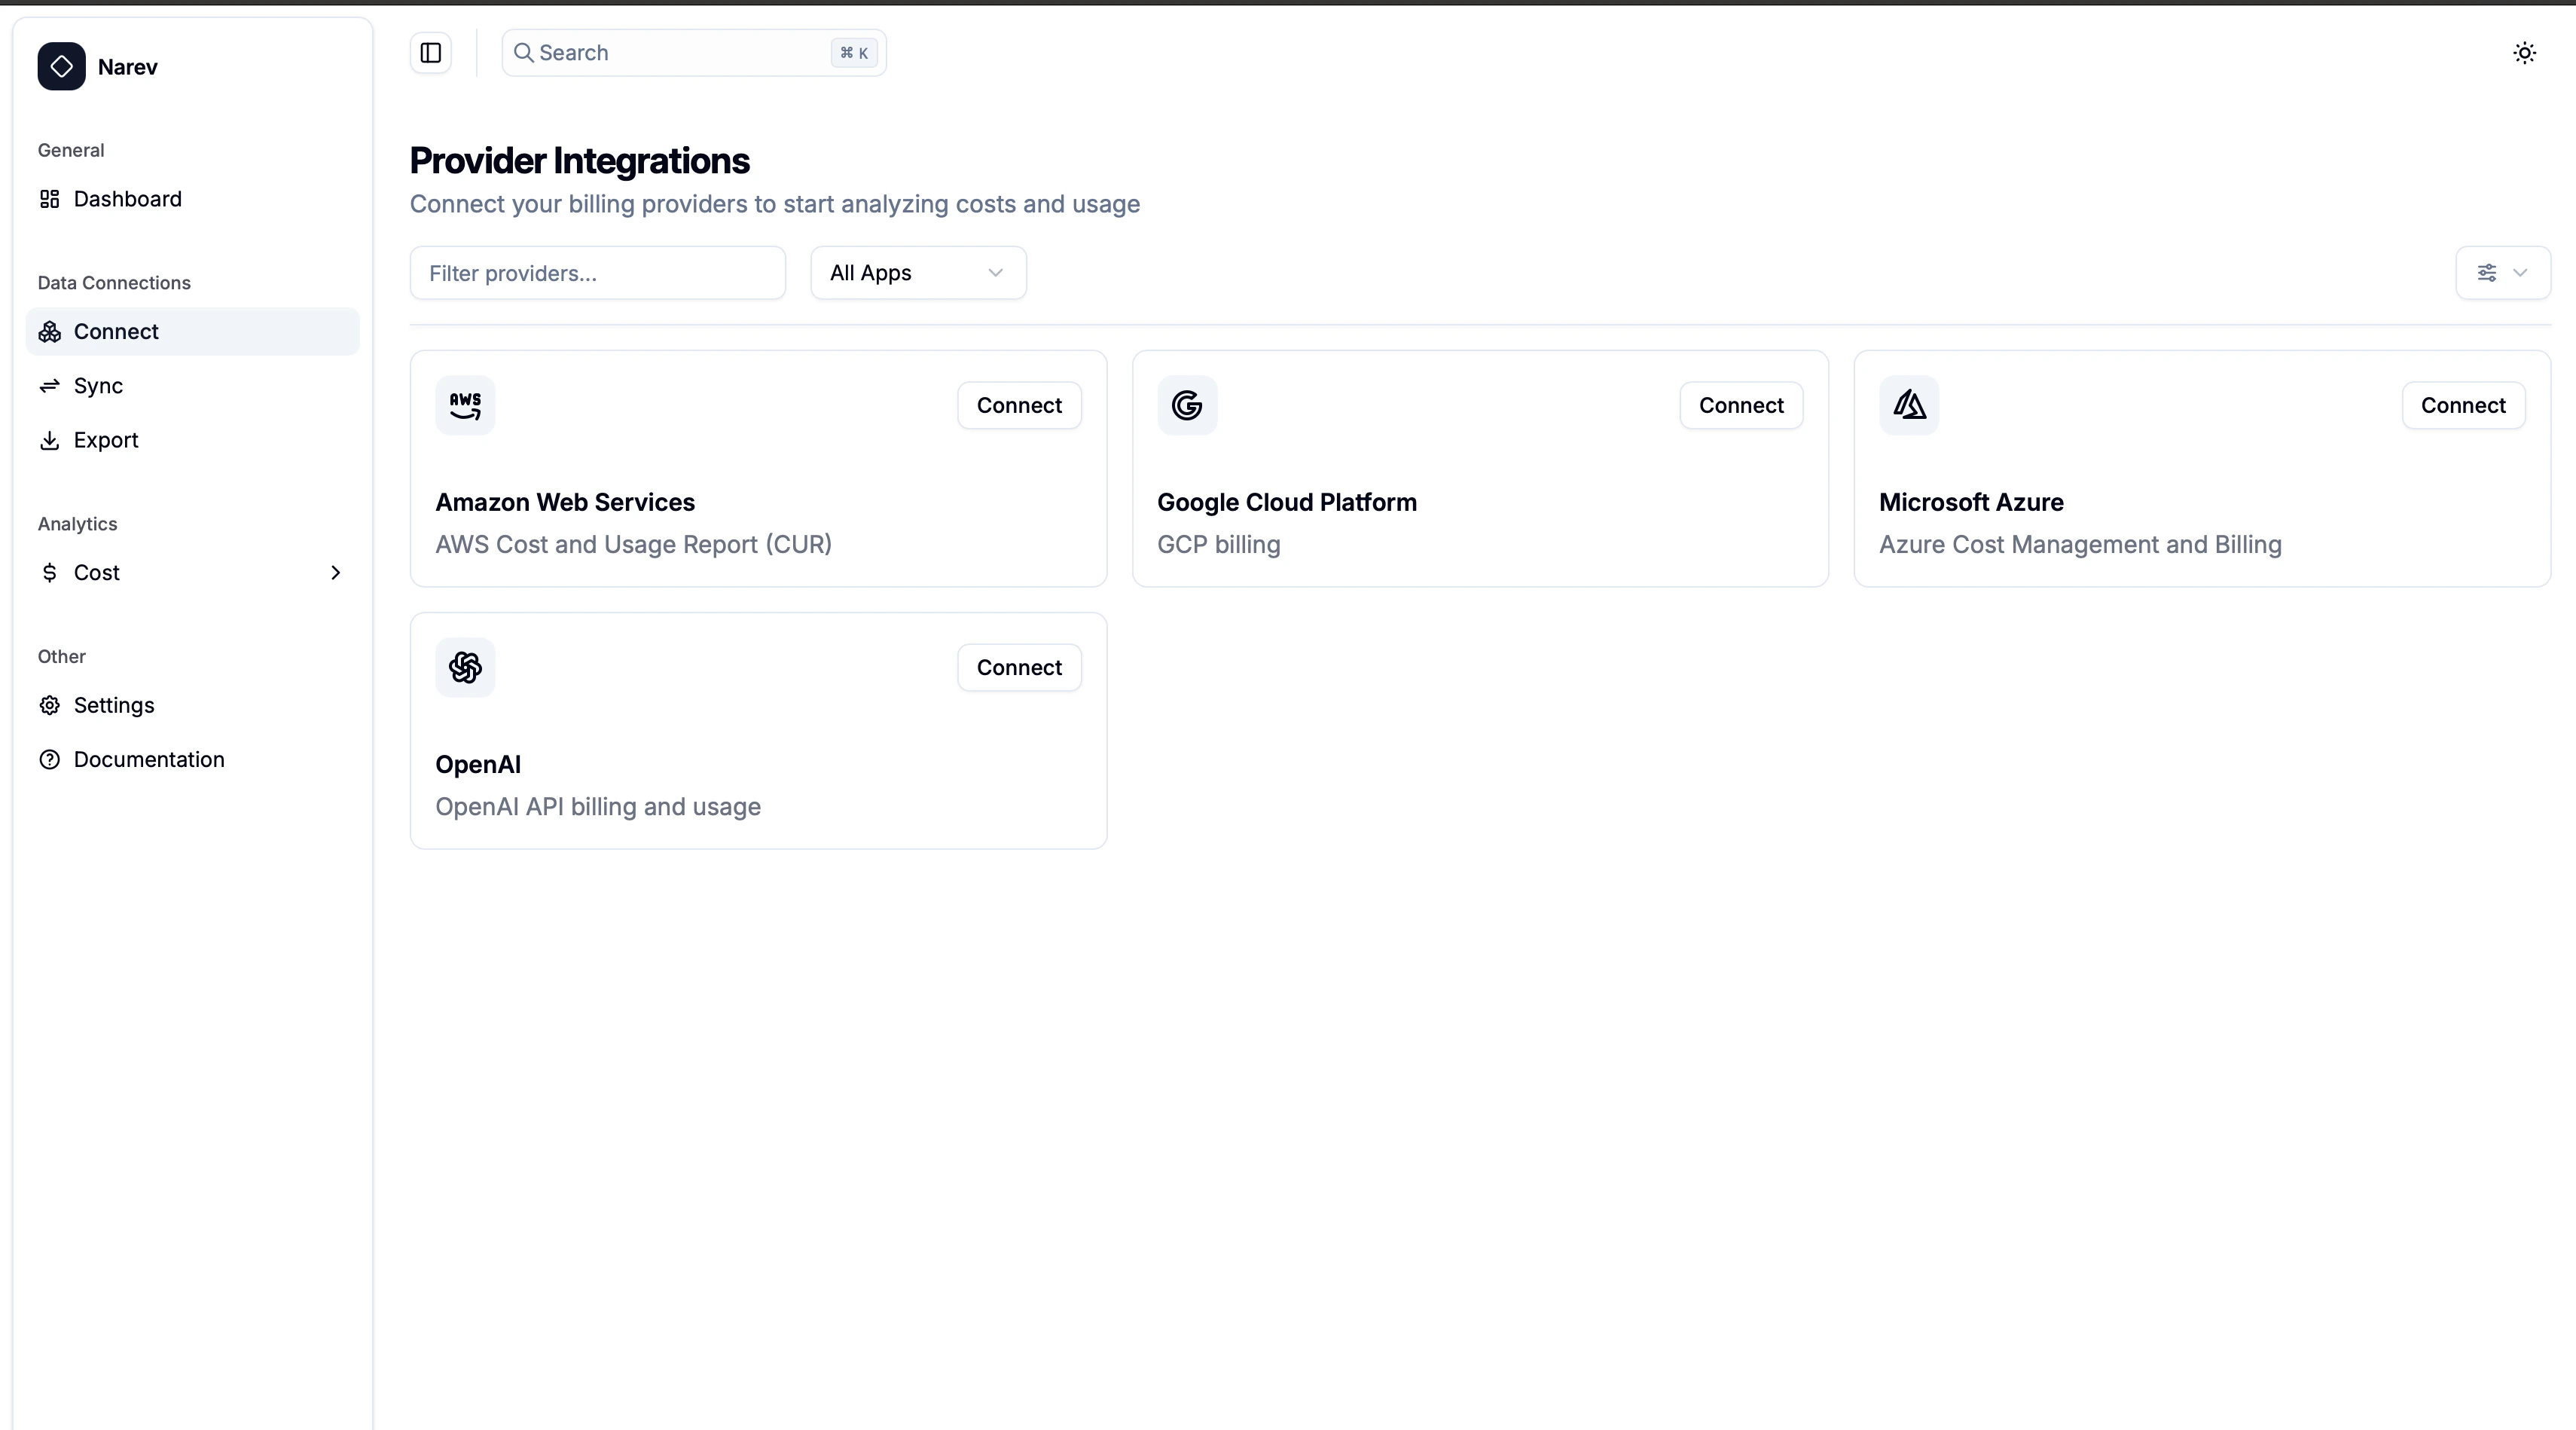
Step 2: Select AWS Provider
- Find the Amazon Web Services card in the provider grid
- Click the Connect button on the AWS card
- The AWS configuration dialog will open
Step 3: Configure AWS Provider
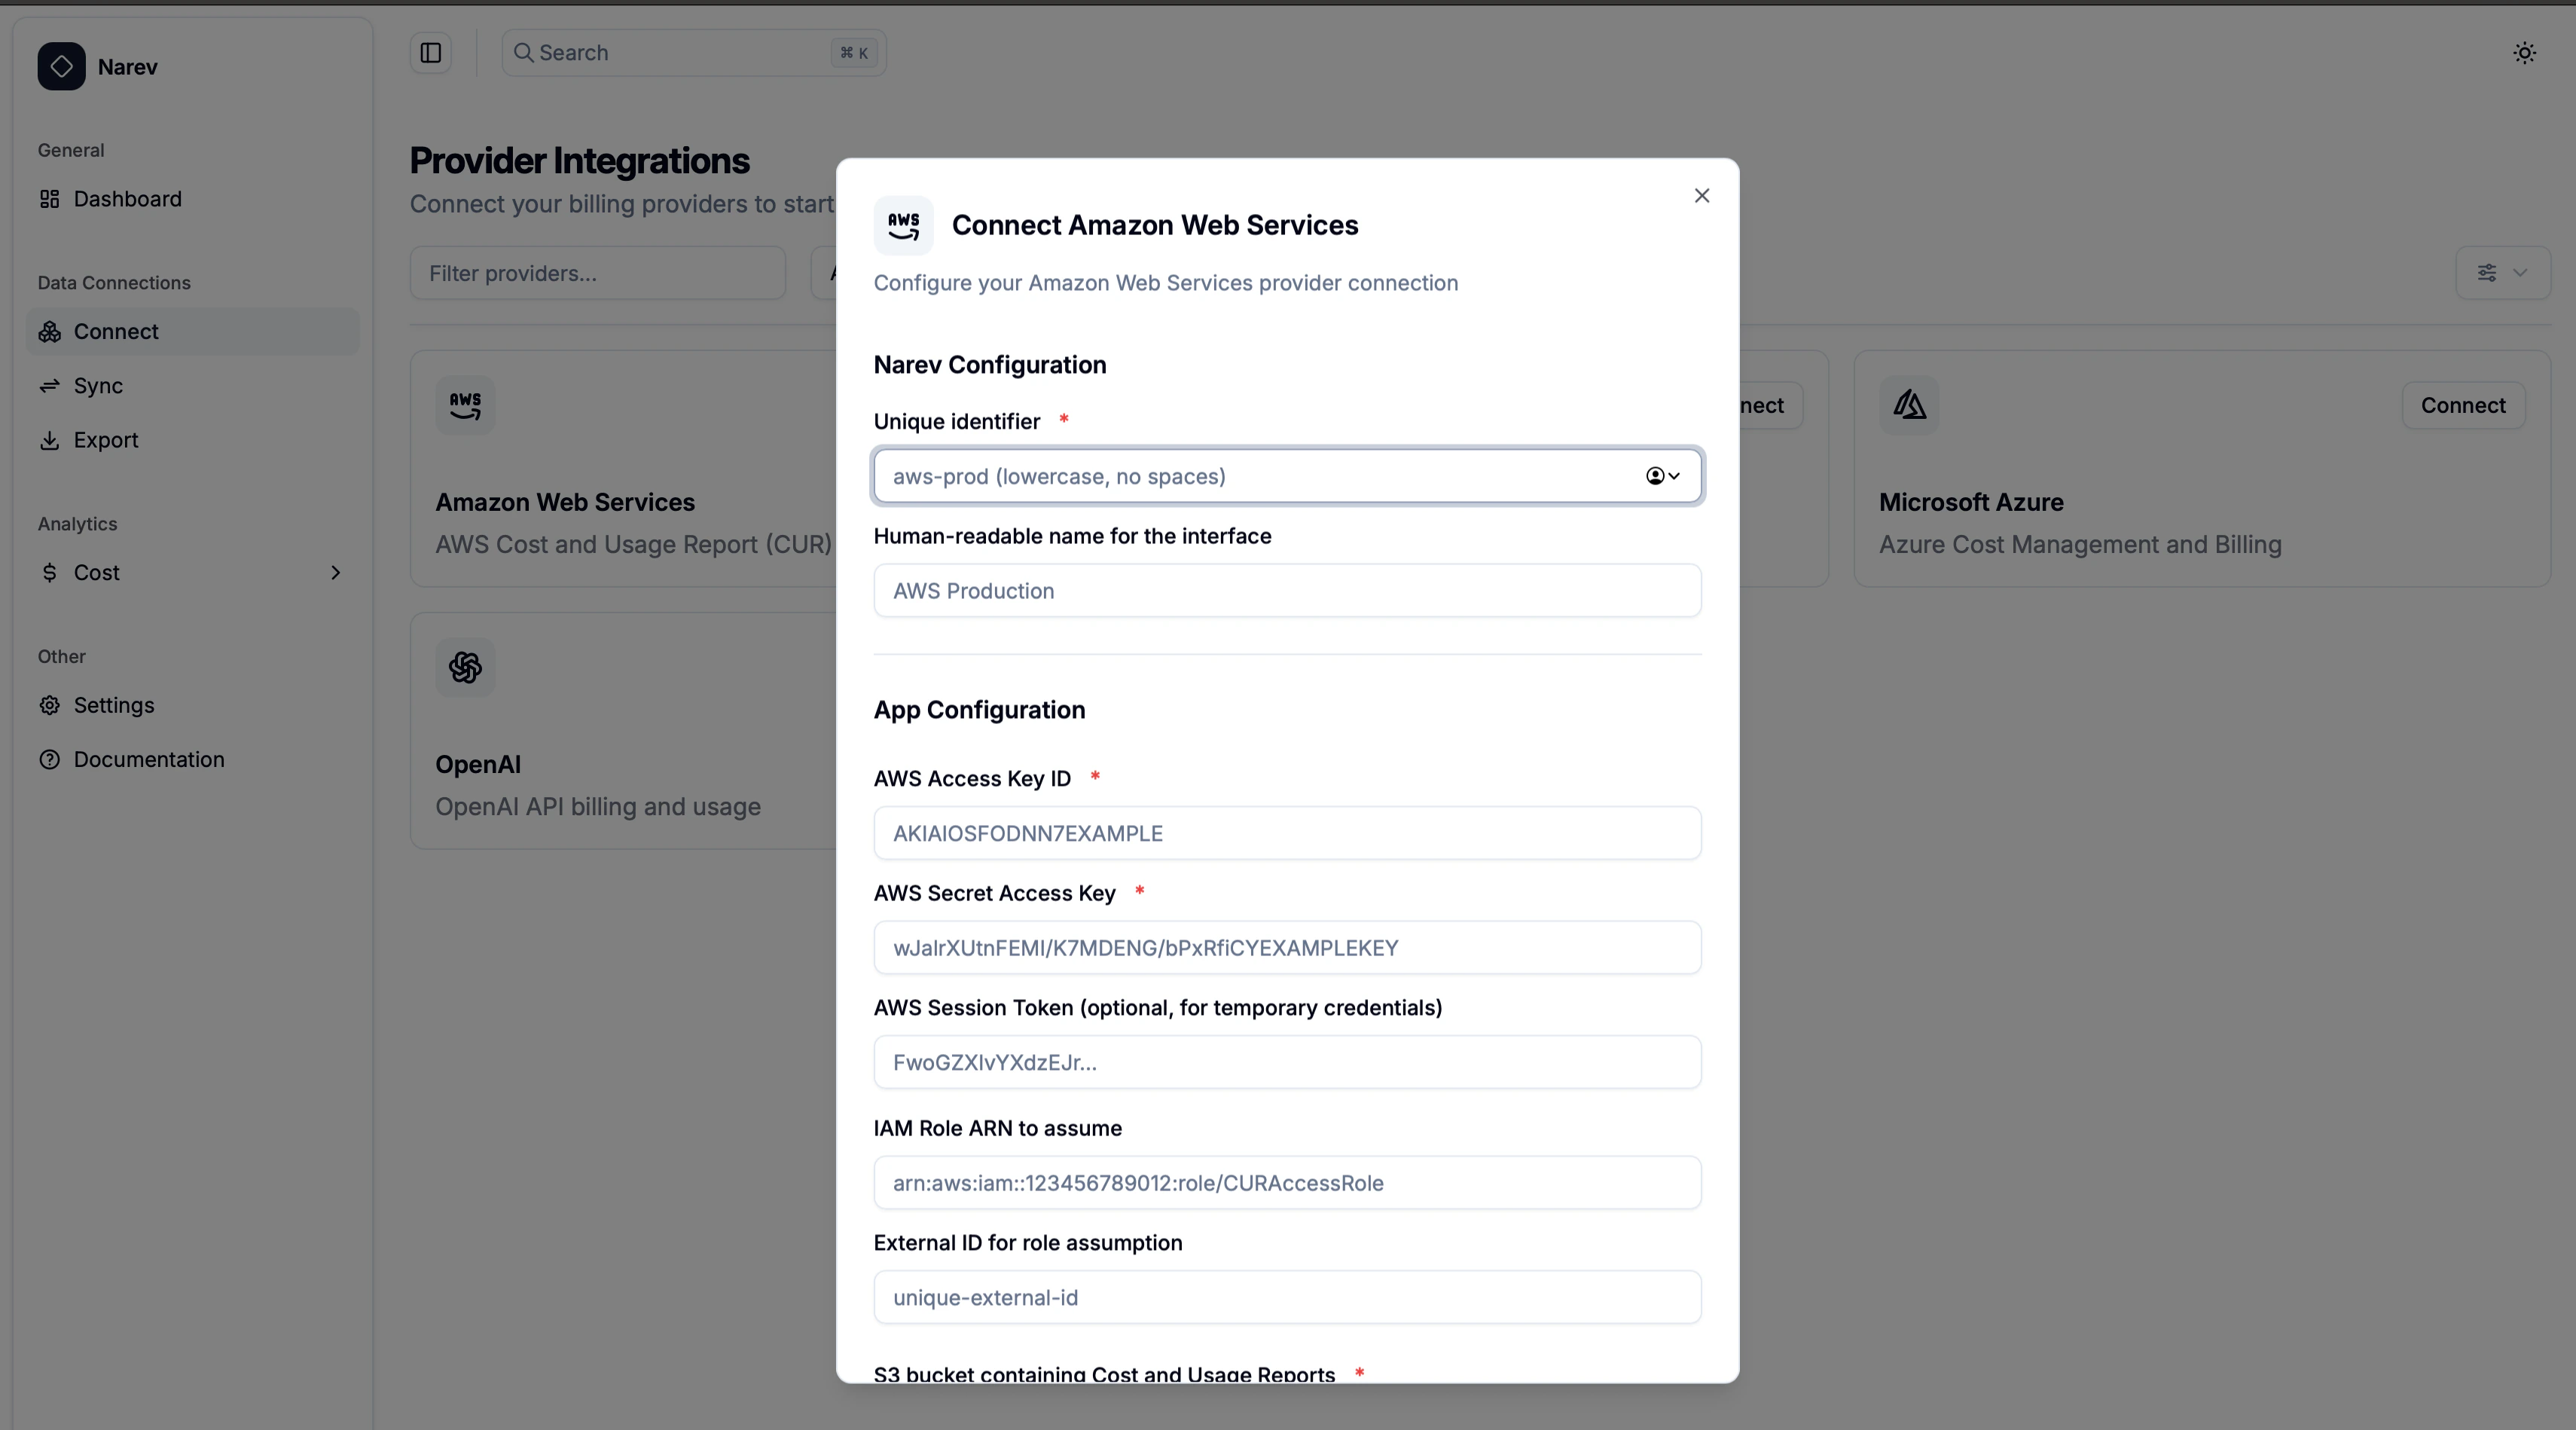
Narev configuration
Provider Name ✅ Required- Unique identifier (for example,
aws-prod,company-aws) - Format: lowercase letters, numbers, hyphens, underscores only
- Human-readable name (for example,
AWS Production,Company AWS) - Shown in the interface
App configuration - AWS credentials ✅ Required
Access Key ID ✅- Your AWS access key (format:
AKIAIOSFODNN7EXAMPLE)
- Your AWS secret key (format:
wJalrXUtnFEMI/K7MDENG...) - Password field with show/hide toggle
- For temporary credentials (format:
FwoGZXIvYXdzEJr...) - Leave empty for permanent keys
IAM Role (Optional)
Role ARN- Cross-account role (format:
arn:aws:iam::123456789012:role/YourRoleName)
- Additional security (for example,
your-unique-external-id)
Provider-specific configuration
Bucket Name ✅ Required- S3 bucket with your exports (for example,
narevfocusexport) - Must match the bucket you configured in AWS Data Exports
- Export name from AWS (for example,
FocusExport,MyCostExport) - Must match exactly what you named your export in AWS
- S3 prefix from AWS Data Export (for example,
focus/,cur/,billing/) - Must match exactly what you specified when creating the export in AWS
- Dropdown selection:
- US East (N. Virginia) - us-east-1
- US West (Oregon) - us-west-2
- EU (Ireland) - eu-west-1
- EU (Frankfurt) - eu-central-1
- Asia Pacific (Singapore) - ap-southeast-1
- Asia Pacific (Tokyo) - ap-northeast-1
Step 4: Connect Provider
- Review all configuration settings
- Click the Connect button
- NarevAI tests the connection to your AWS S3 bucket
- If successful, NarevAI adds the provider and marks it as “Connected”
- You can now sync billing data from this AWS account
- AWS credentials validation
- S3 bucket access verification
- Export files detection
- Permissions check
Configuration examples
Basic setup with FOCUS export
Cross-Account Access with IAM Role
Legacy CUR Export Setup
Common Test Results
Success Response
Access Denied
- Solution: Verify your credentials have S3 permissions for the specified bucket
Bucket Not Found
- Solution: Check the bucket name spelling and ensure it exists in the specified region
Invalid Credentials
- Solution: Verify your Access Key ID and Secret Access Key are correct
Supported Features
The AWS provider supports:- ✅ Cost and Usage Report (CUR) data
- ✅ FOCUS 1.0 format (recommended)
- ✅ Legacy CUR format
- ✅ Detailed billing information
- ✅ Resource tags analysis
- ✅ Cost allocation tags
- ✅ Savings Plans data
- ✅ Reserved Instances information
- ✅ Cost optimization recommendations
- ✅ Carbon emissions data
- ✅ Cross-account access via IAM roles
Troubleshooting
Permission Issues
- Ensure your AWS credentials have
s3:GetObject,s3:ListBucket, ands3:GetBucketLocationpermissions - Verify the S3 bucket policy allows access from your credentials
- Check IAM role trust relationships if using cross-account access
Export Configuration Issues
- Verify your Data Export is actively generating files
- Check that the export includes the data types you need (FOCUS 1.0 recommended)
- Ensure the S3 bucket and prefix match your export delivery settings
- Confirm the export name matches exactly (case-sensitive)
Authentication Failures
- For access keys: Verify they are active and not expired
- For IAM roles: Check the role ARN format and trust relationships
- For temporary credentials: Ensure session tokens are current
Regional Issues
- Verify the S3 bucket exists in the specified region
- Some AWS services require specific regional configurations
- Cross-region access may have additional latency
No Data Found
- Check if export files exist in the specified S3 path
- Verify the export name matches exactly (case-sensitive)
- Ensure your billing period has completed for data to be available
- For new exports, wait 24 hours for the first data to be generated
Data Collection
Once configured, the AWS provider will collect:- Usage metrics: Service usage, resource hours, data transfer
- Cost data: On-demand costs, reserved instance savings, spot pricing
- Resource information: Instance types, regions, availability zones
- Tagging data: Cost allocation tags, resource tags for cost attribution
- Time-series data: Daily cost breakdowns and usage patterns
- FOCUS-compliant data: Standardized cost and usage data format