> ## Documentation Index
> Fetch the complete documentation index at: https://narev.ai/docs/llms.txt
> Use this file to discover all available pages before exploring further.
# Amazon Web Services
> Connect AWS Cost and Usage Reports from S3 to Narev Self-Hosted using IAM credentials, then sync them into the FOCUS specification.
## Prerequisites
* Active AWS account with billing data access
* Cost and Usage Report (CUR) configured and published to S3
* AWS credentials with appropriate permissions
* S3 bucket containing CUR files
* Optionally: Identity and Access Management (IAM) role for cross-account access
## Setting up cost and usage reports
### 1. Enable cost and usage reports
1. Sign in to the AWS Management Console
2. In the search bar at the top, type "Cost and Usage Reports" and select it from the dropdown
* Alternatively, you can find it under **Billing and Cost Management** in the services menu
* Or navigate to **Billing dashboard** > **Data Exports** in the left sidebar
3. In the Billing and Cost Management console, click **Data Exports** tab
4. Click **Create export**
 ### 2. Configure export details
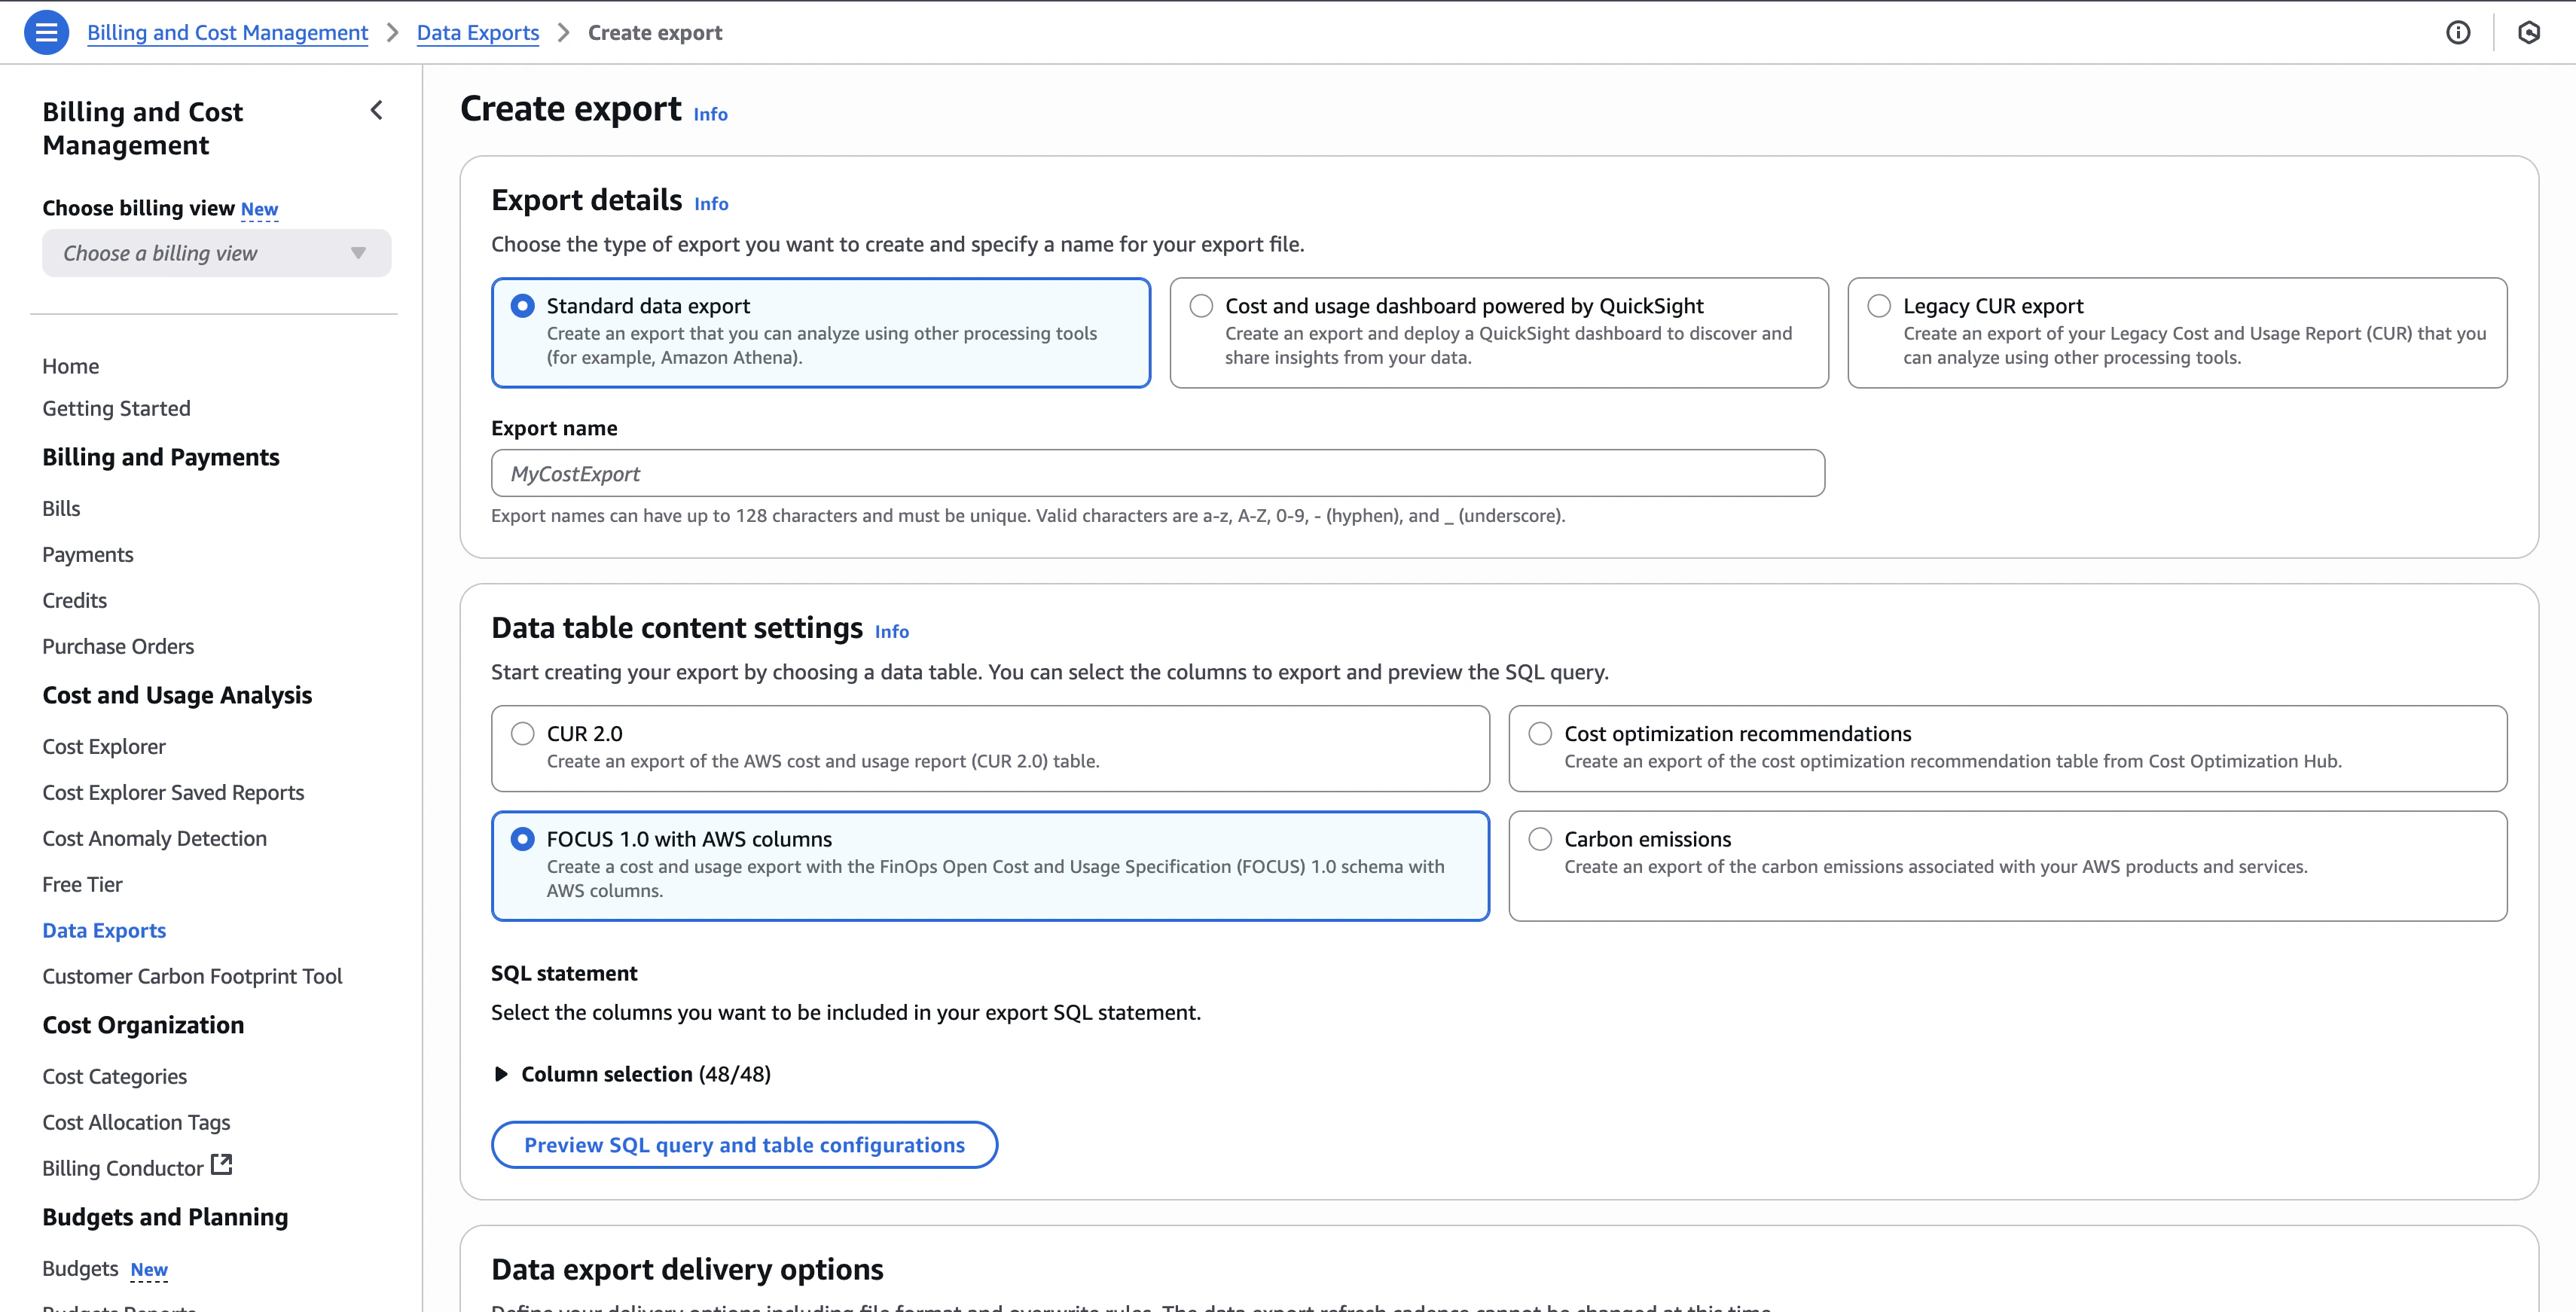
1. **Choose Export Type:**
* Select **Standard data export** (recommended for NarevAI integration)
* Alternatively, you can choose **Legacy CUR export** for compatibility with older systems
2. **Export Name:**
* Enter a descriptive name (for example, `MyCostExport`, `NarevAI-Export`)
* Export names can have up to 128 characters and must be unique
* Valid characters are a-z, A-Z, 0-9, - (hyphen), and \_ (underscore)
### 3. Data table content settings
Select **FOCUS 1.0 with AWS columns** - this is the format NarevAI optimizes for:
* **FOCUS 1.0 with AWS columns** ✅ (Required)
* Standardized FinOps cost data format
* Includes AWS-specific metadata for detailed analysis
* Fully supported by NarevAI's cost optimization engine
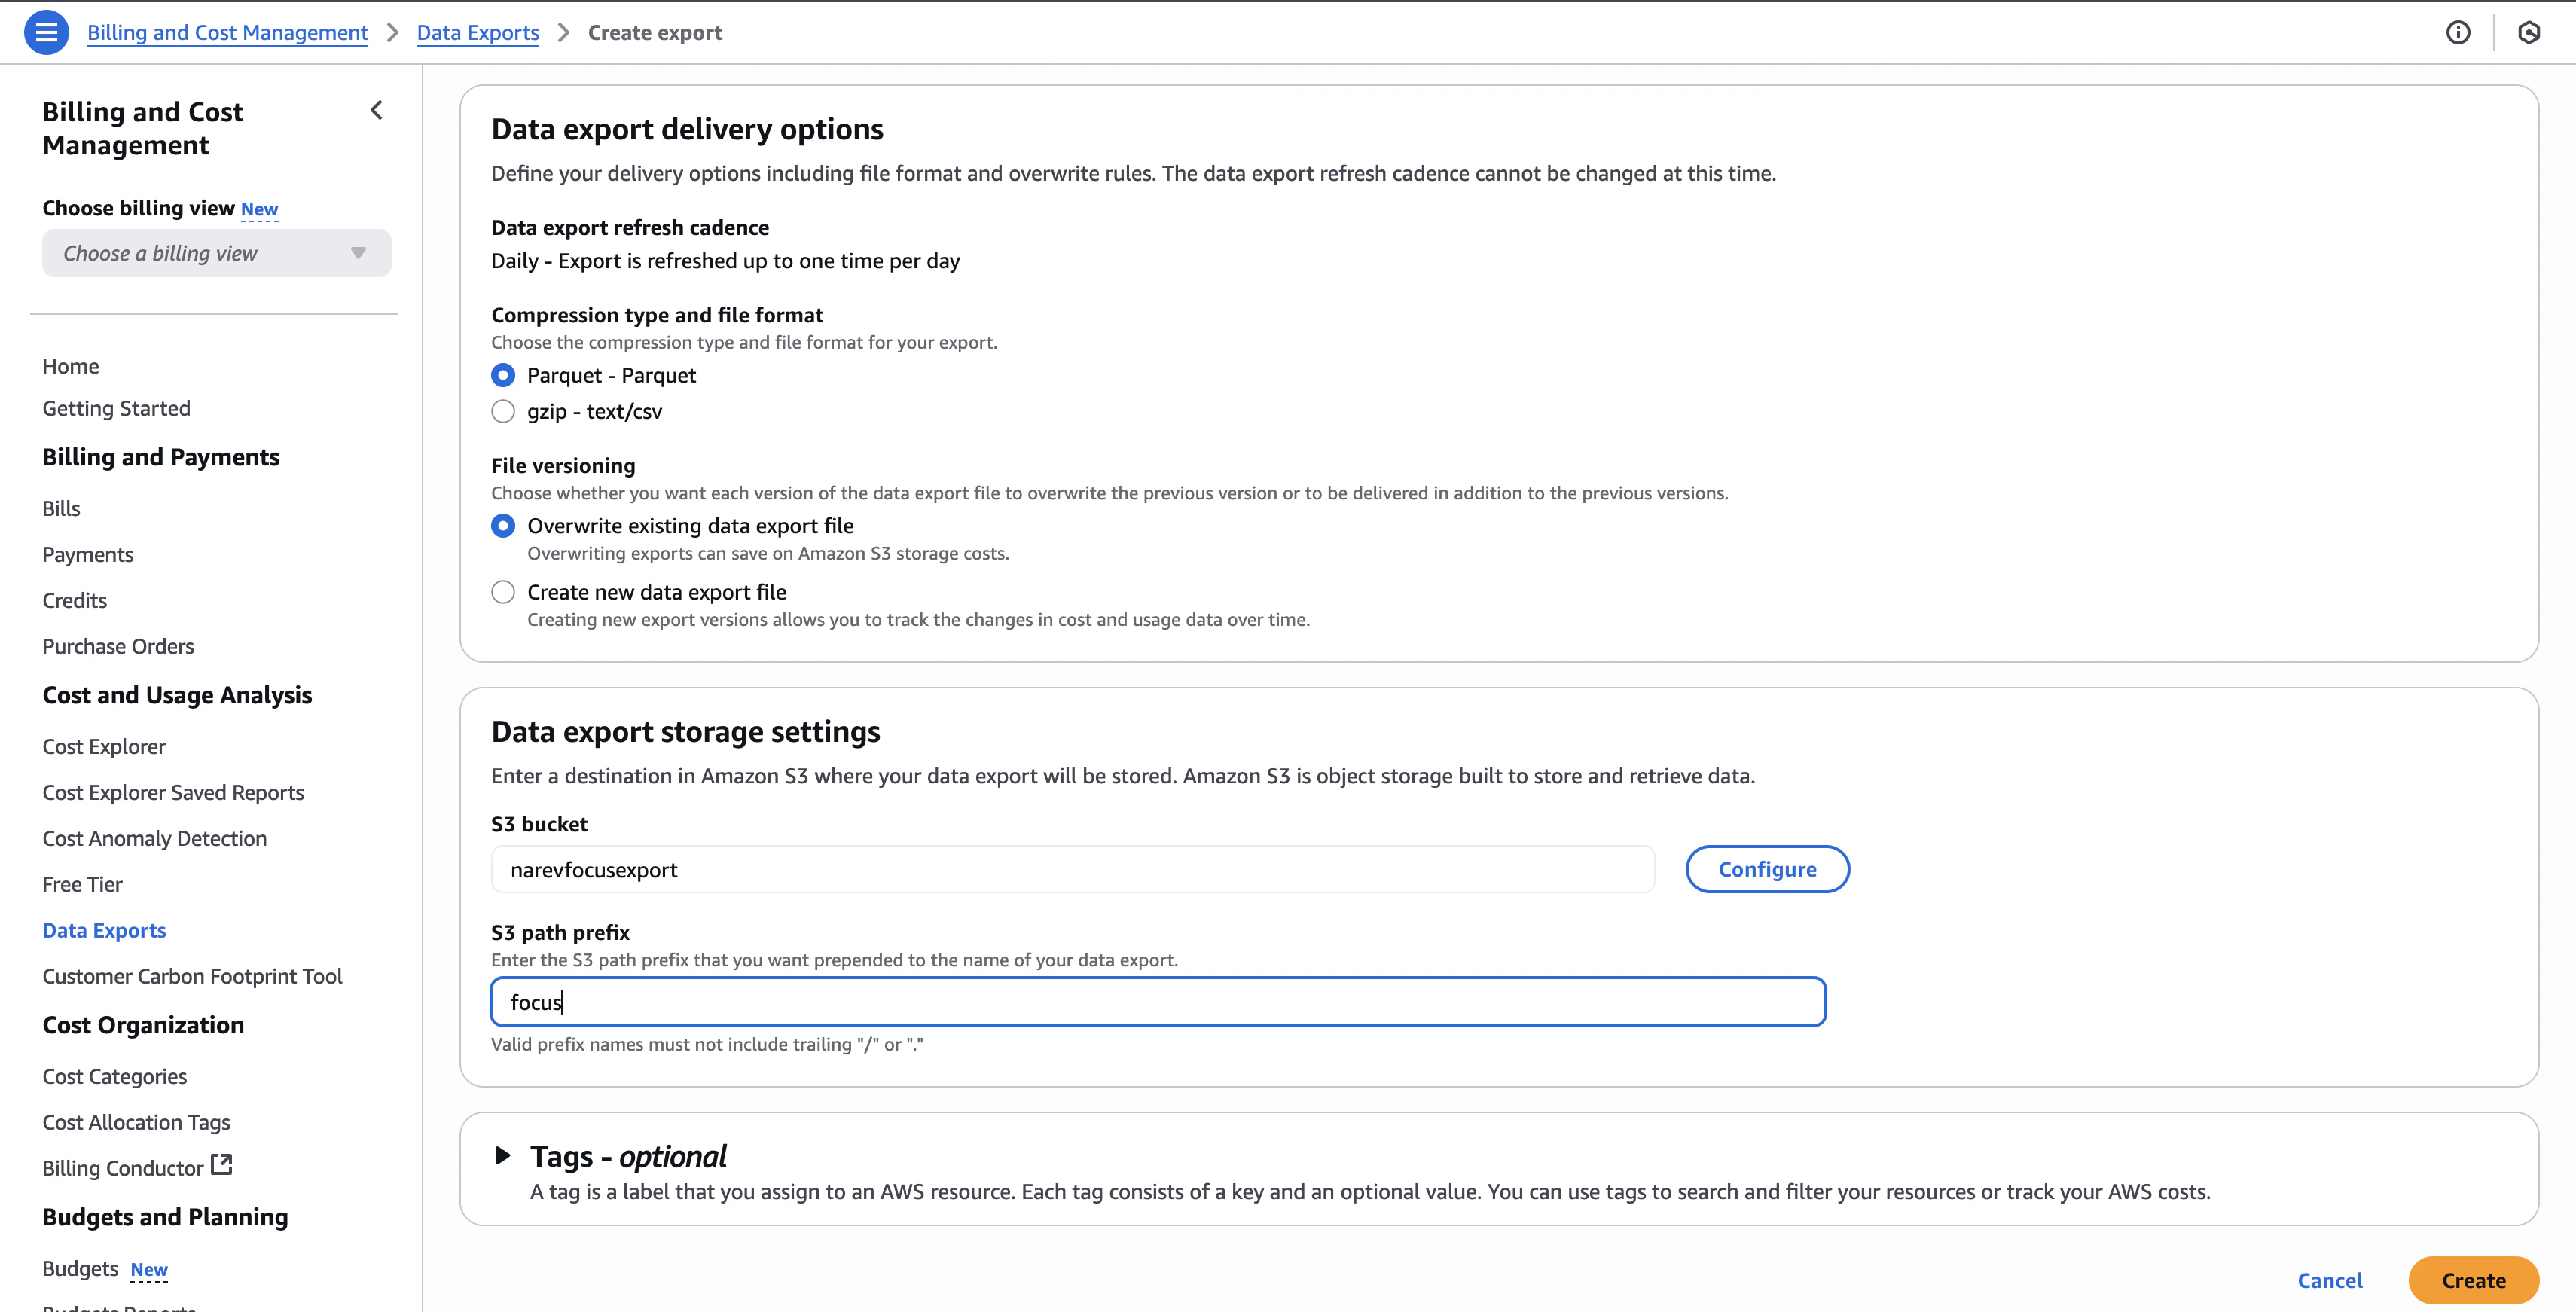
### 4. Data export delivery options
Configure how your export will be delivered:
### 2. Configure export details
1. **Choose Export Type:**
* Select **Standard data export** (recommended for NarevAI integration)
* Alternatively, you can choose **Legacy CUR export** for compatibility with older systems
2. **Export Name:**
* Enter a descriptive name (for example, `MyCostExport`, `NarevAI-Export`)
* Export names can have up to 128 characters and must be unique
* Valid characters are a-z, A-Z, 0-9, - (hyphen), and \_ (underscore)
### 3. Data table content settings
Select **FOCUS 1.0 with AWS columns** - this is the format NarevAI optimizes for:
* **FOCUS 1.0 with AWS columns** ✅ (Required)
* Standardized FinOps cost data format
* Includes AWS-specific metadata for detailed analysis
* Fully supported by NarevAI's cost optimization engine
### 4. Data export delivery options
Configure how your export will be delivered:
 #### Compression type and file format
* **Parquet - Parquet** (recommended for better performance and smaller files)
* **GZIP - text/csv** (for compatibility with older systems)
#### File versioning
* **Overwrite existing data export file** - Saves on Amazon S3 storage costs (recommended)
* **Create new data export file** - Allows you to track changes in cost and usage data over time
### 5. Configure S3 storage settings
#### S3 bucket configuration
1. **S3 Bucket:**
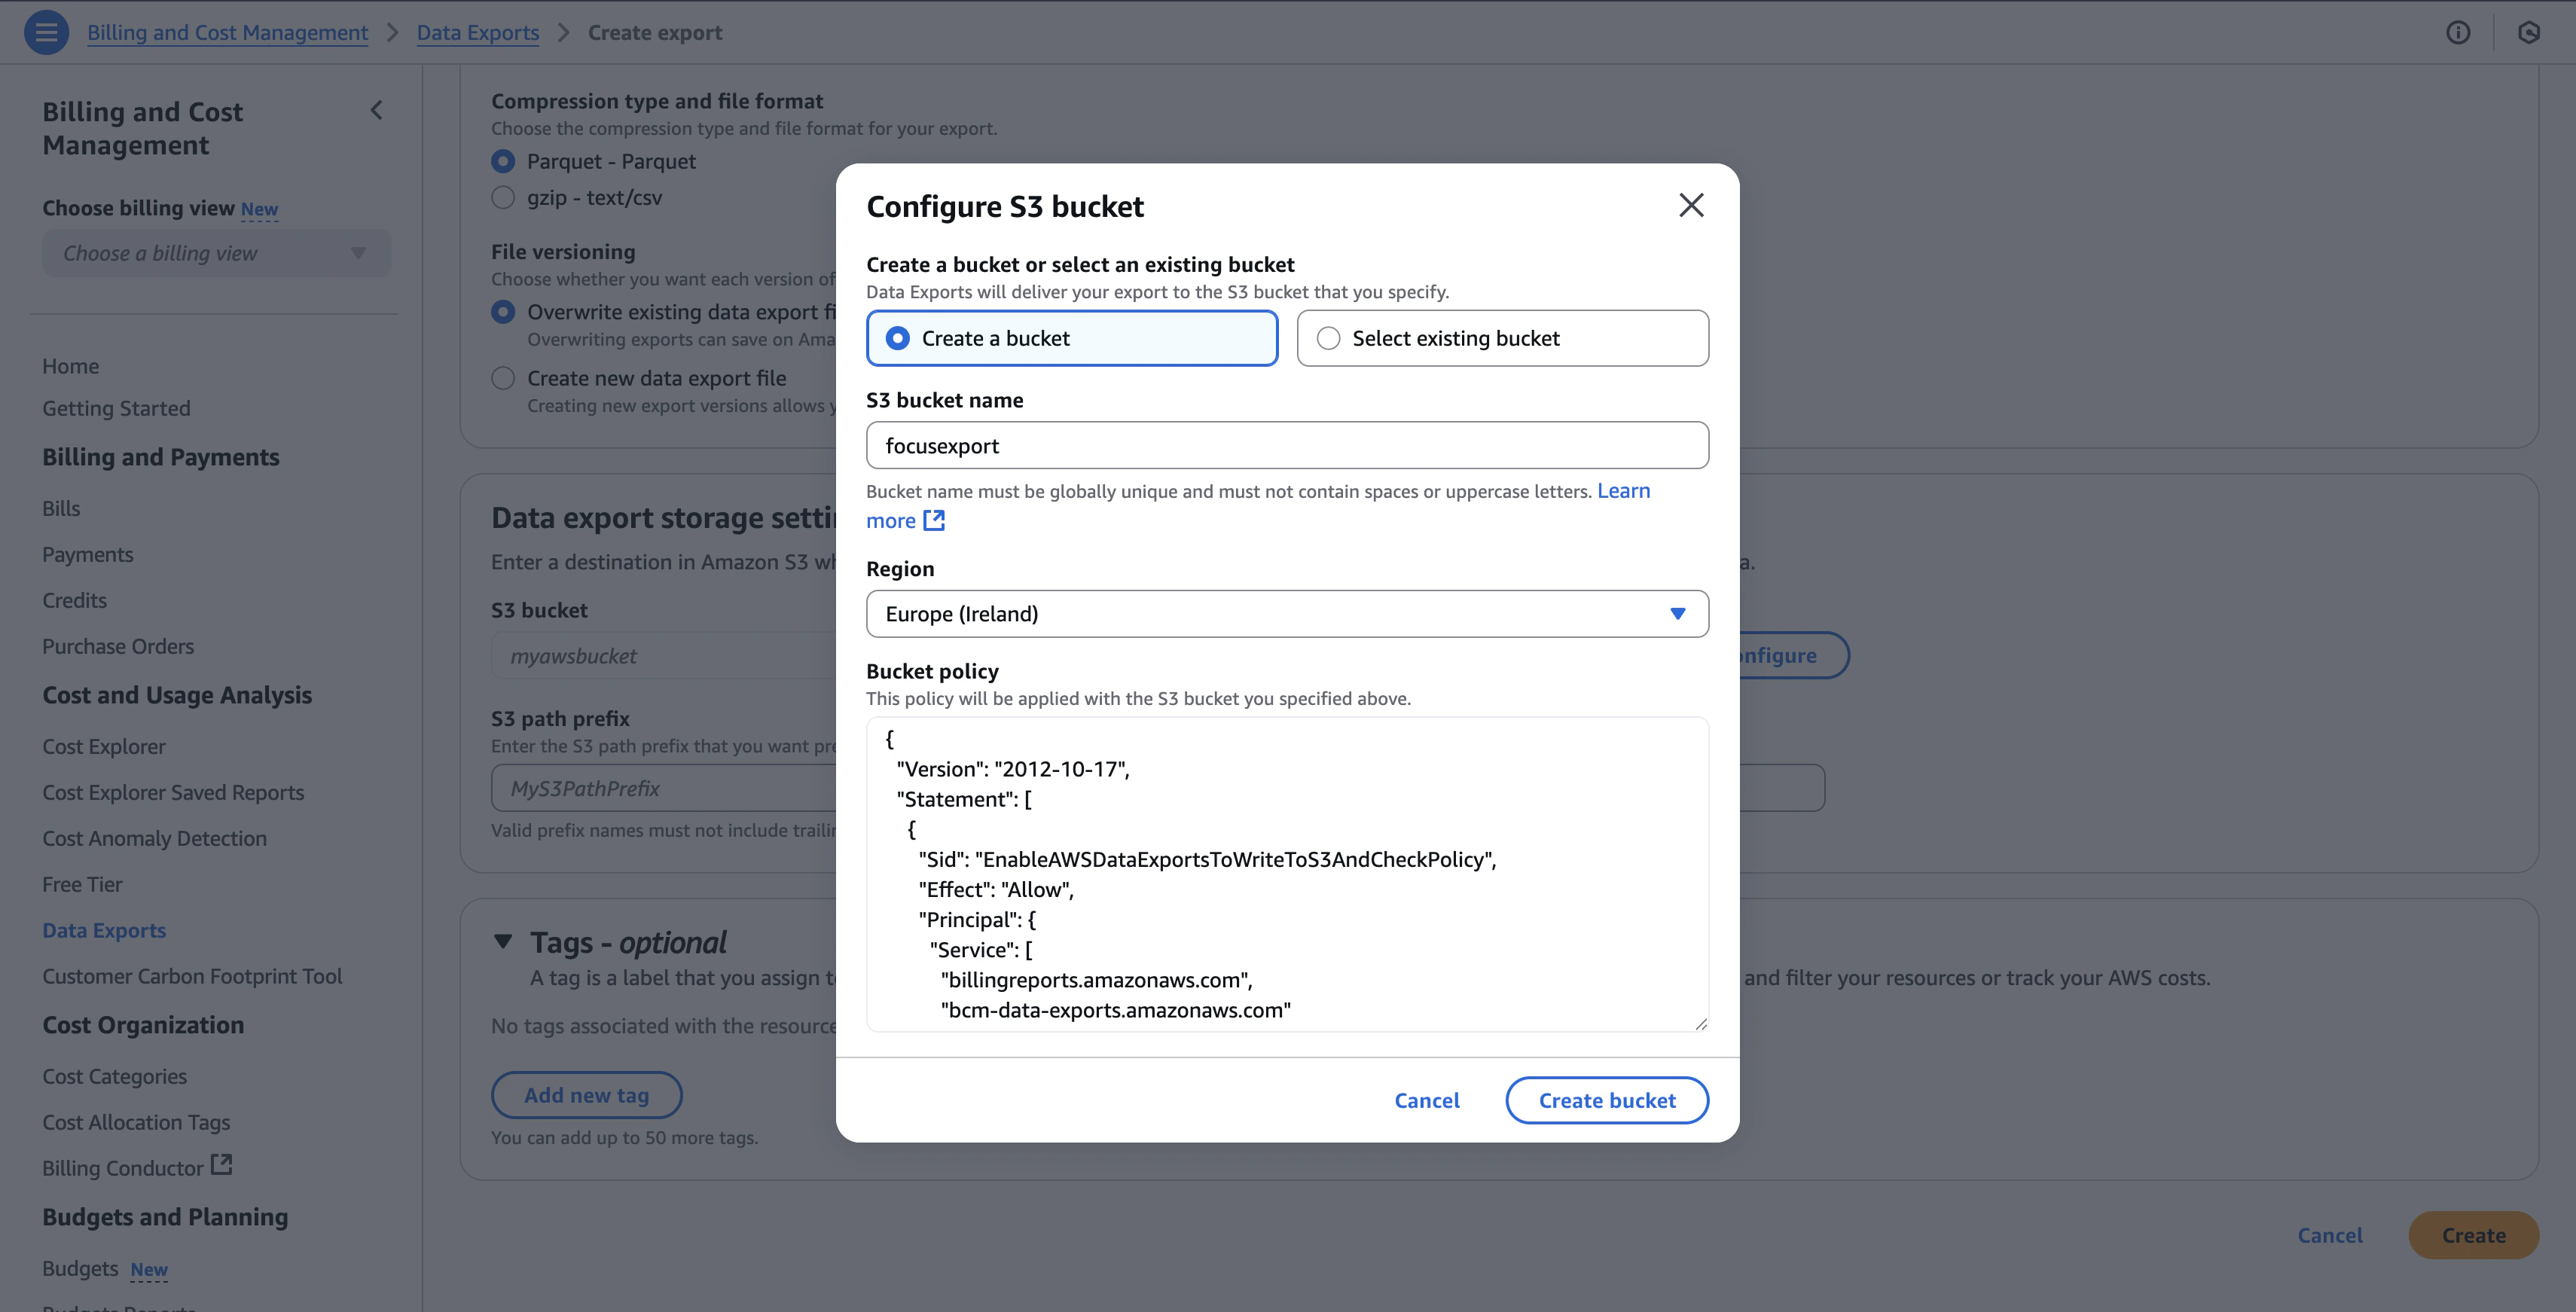
* Click **Configure** to set up your S3 bucket
* You can either:
* **Create a bucket** - AWS creates a new bucket for you
* **Select existing bucket** - Choose from your existing S3 buckets
#### Compression type and file format
* **Parquet - Parquet** (recommended for better performance and smaller files)
* **GZIP - text/csv** (for compatibility with older systems)
#### File versioning
* **Overwrite existing data export file** - Saves on Amazon S3 storage costs (recommended)
* **Create new data export file** - Allows you to track changes in cost and usage data over time
### 5. Configure S3 storage settings
#### S3 bucket configuration
1. **S3 Bucket:**
* Click **Configure** to set up your S3 bucket
* You can either:
* **Create a bucket** - AWS creates a new bucket for you
* **Select existing bucket** - Choose from your existing S3 buckets
 2. **For New Buckets:**
* **S3 bucket name**: Choose a globally unique name (for example, `company-focus-export`)
* **Region**: Select the region where you want to store your data
* **Bucket policy**: AWS automatically applies the necessary policy for Data Exports access
3. **S3 Path Prefix:**
* Enter a prefix for organizing your exports (for example, `focus`, `cur`, `billing`)
* Valid prefix names must not include trailing "/" or "\*"
#### Example configuration
```text theme={null}
S3 bucket: narevfocusexport
S3 path prefix: focus
Region: Europe (Ireland)
```
### 6. Tags (Optional)
Add tags to help organize and track your AWS costs:
* Each tag consists of a key and an optional value
* You can add up to 50 tags
* Use tags to search, filter, and track your AWS costs
## AWS Credentials Setup
NarevAI requires AWS credentials to access your cost data. Here's what you need:
### Required: Access Keys ✅
**Always required** - these are your basic AWS credentials:
1. In the AWS Console search bar, type "IAM" and select **IAM** from the dropdown
2. In the IAM console, click **Users** in the left sidebar
3. Select your user or create a new user for billing access
4. Go to **Security credentials** tab
5. Click **Create access key**
6. Choose **Application running outside AWS**
7. Save both the **Access Key ID** and **Secret Access Key**
**Required Permissions:**
```json theme={null}
{
"Version": "2012-10-17",
"Statement": [
{
"Effect": "Allow",
"Action": ["s3:GetObject", "s3:ListBucket", "s3:GetBucketLocation"],
"Resource": ["arn:aws:s3:::your-export-bucket", "arn:aws:s3:::your-export-bucket/*"]
}
]
}
```
### Optional: IAM Role for Enhanced Security 🔒
**Use when you need:**
* **Cross-account access** (bucket in different AWS account)
* **Enhanced security** (temporary credentials)
* **Better auditing** (role-based access logging)
**How it works:**
1. NarevAI logs in with your Access Keys
2. Then assumes the IAM Role for actual data access
3. Uses temporary credentials with limited permissions
**Setup:**
1. In IAM console, click **Roles** → **Create role**
2. Select **AWS account** as trusted entity
3. Enter the account ID that needs access
4. Optionally, require an **External ID** for extra security
5. Attach the same S3 permissions policy above
6. Note the **Role ARN** for NarevAI configuration
**📚 Detailed AWS Guides:**
* [IAM Tutorial: Cross-Account Access with Roles](https://docs.aws.amazon.com/IAM/latest/UserGuide/tutorial_cross-account-with-roles.html)
* [AWS Billing IAM Permissions](https://docs.aws.amazon.com/awsaccountbilling/latest/aboutv2/security-iam.html)
* [Cross-Account Resource Access](https://docs.aws.amazon.com/IAM/latest/UserGuide/access_policies-cross-account-resource-access.html)
## Adding AWS Provider in NarevAI
### Step 1: Navigate to Connect
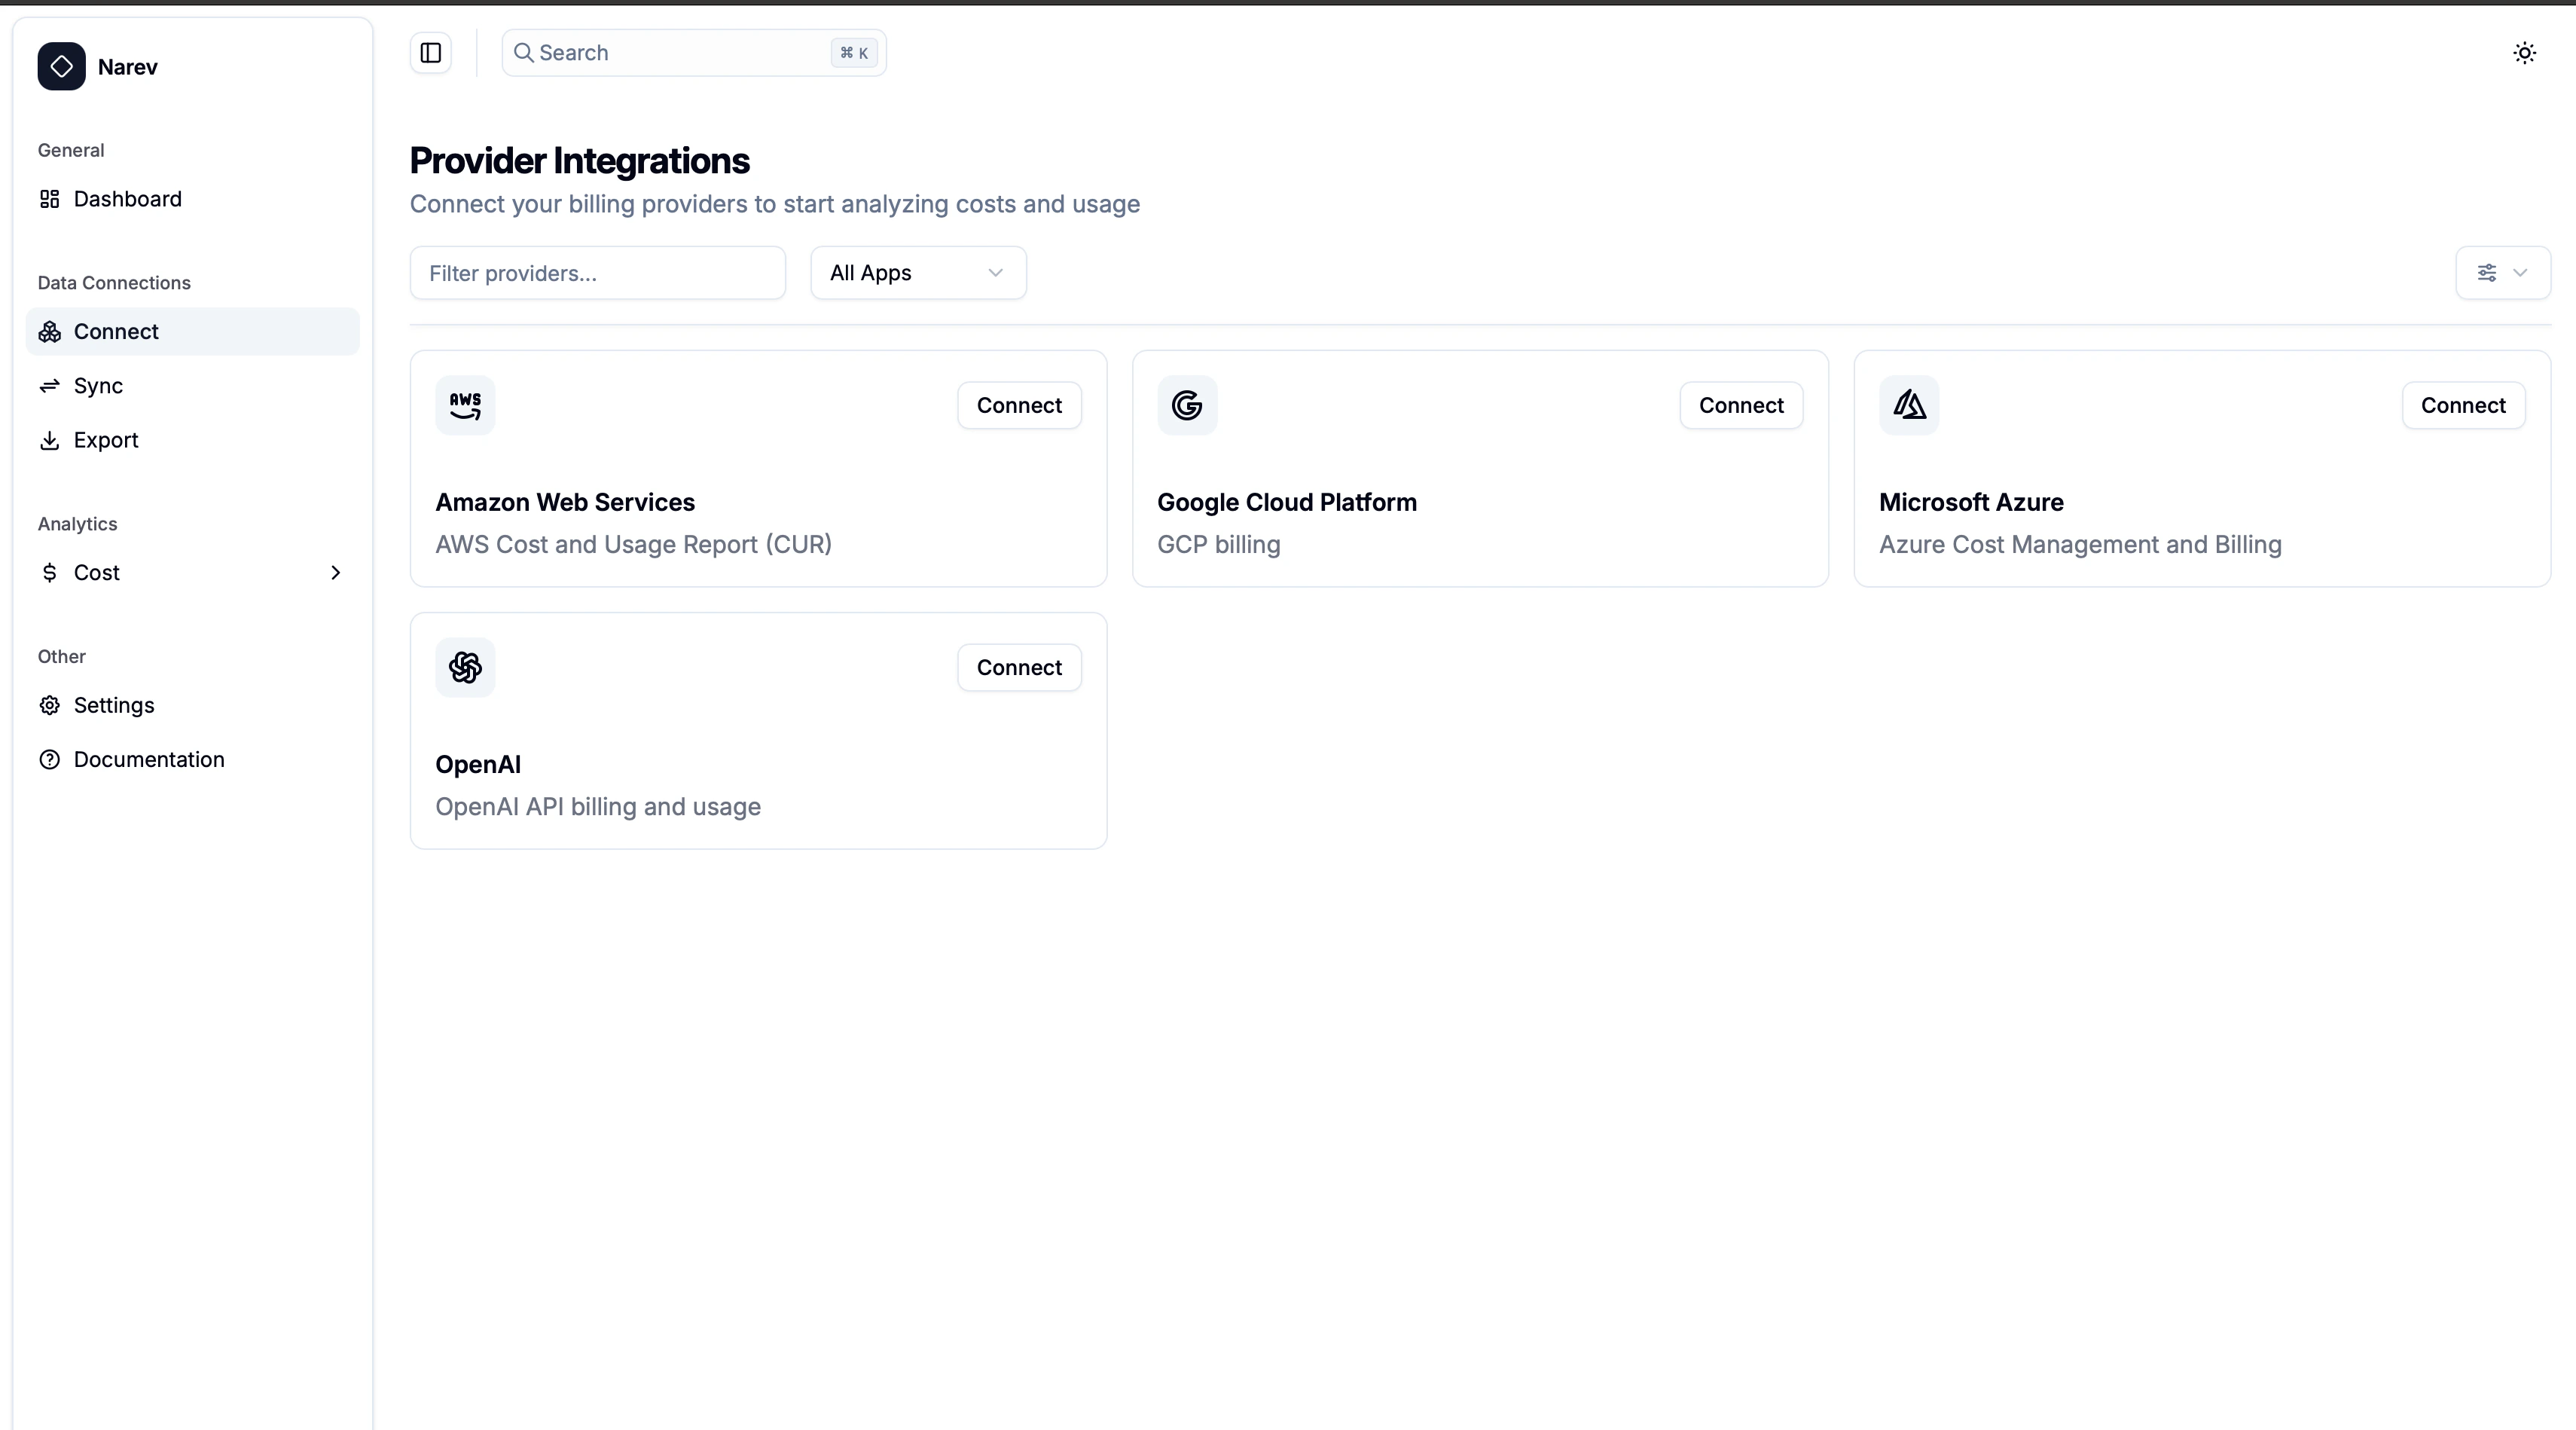
1. In the NarevAI sidebar, under **Data Connections**, click **Connect**
2. You'll see the "Provider Integrations" page with available providers
2. **For New Buckets:**
* **S3 bucket name**: Choose a globally unique name (for example, `company-focus-export`)
* **Region**: Select the region where you want to store your data
* **Bucket policy**: AWS automatically applies the necessary policy for Data Exports access
3. **S3 Path Prefix:**
* Enter a prefix for organizing your exports (for example, `focus`, `cur`, `billing`)
* Valid prefix names must not include trailing "/" or "\*"
#### Example configuration
```text theme={null}
S3 bucket: narevfocusexport
S3 path prefix: focus
Region: Europe (Ireland)
```
### 6. Tags (Optional)
Add tags to help organize and track your AWS costs:
* Each tag consists of a key and an optional value
* You can add up to 50 tags
* Use tags to search, filter, and track your AWS costs
## AWS Credentials Setup
NarevAI requires AWS credentials to access your cost data. Here's what you need:
### Required: Access Keys ✅
**Always required** - these are your basic AWS credentials:
1. In the AWS Console search bar, type "IAM" and select **IAM** from the dropdown
2. In the IAM console, click **Users** in the left sidebar
3. Select your user or create a new user for billing access
4. Go to **Security credentials** tab
5. Click **Create access key**
6. Choose **Application running outside AWS**
7. Save both the **Access Key ID** and **Secret Access Key**
**Required Permissions:**
```json theme={null}
{
"Version": "2012-10-17",
"Statement": [
{
"Effect": "Allow",
"Action": ["s3:GetObject", "s3:ListBucket", "s3:GetBucketLocation"],
"Resource": ["arn:aws:s3:::your-export-bucket", "arn:aws:s3:::your-export-bucket/*"]
}
]
}
```
### Optional: IAM Role for Enhanced Security 🔒
**Use when you need:**
* **Cross-account access** (bucket in different AWS account)
* **Enhanced security** (temporary credentials)
* **Better auditing** (role-based access logging)
**How it works:**
1. NarevAI logs in with your Access Keys
2. Then assumes the IAM Role for actual data access
3. Uses temporary credentials with limited permissions
**Setup:**
1. In IAM console, click **Roles** → **Create role**
2. Select **AWS account** as trusted entity
3. Enter the account ID that needs access
4. Optionally, require an **External ID** for extra security
5. Attach the same S3 permissions policy above
6. Note the **Role ARN** for NarevAI configuration
**📚 Detailed AWS Guides:**
* [IAM Tutorial: Cross-Account Access with Roles](https://docs.aws.amazon.com/IAM/latest/UserGuide/tutorial_cross-account-with-roles.html)
* [AWS Billing IAM Permissions](https://docs.aws.amazon.com/awsaccountbilling/latest/aboutv2/security-iam.html)
* [Cross-Account Resource Access](https://docs.aws.amazon.com/IAM/latest/UserGuide/access_policies-cross-account-resource-access.html)
## Adding AWS Provider in NarevAI
### Step 1: Navigate to Connect
1. In the NarevAI sidebar, under **Data Connections**, click **Connect**
2. You'll see the "Provider Integrations" page with available providers
 ### Step 2: Select AWS Provider
1. Find the **Amazon Web Services** card in the provider grid
2. Click the **Connect** button on the AWS card
3. The AWS configuration dialog will open
### Step 2: Select AWS Provider
1. Find the **Amazon Web Services** card in the provider grid
2. Click the **Connect** button on the AWS card
3. The AWS configuration dialog will open
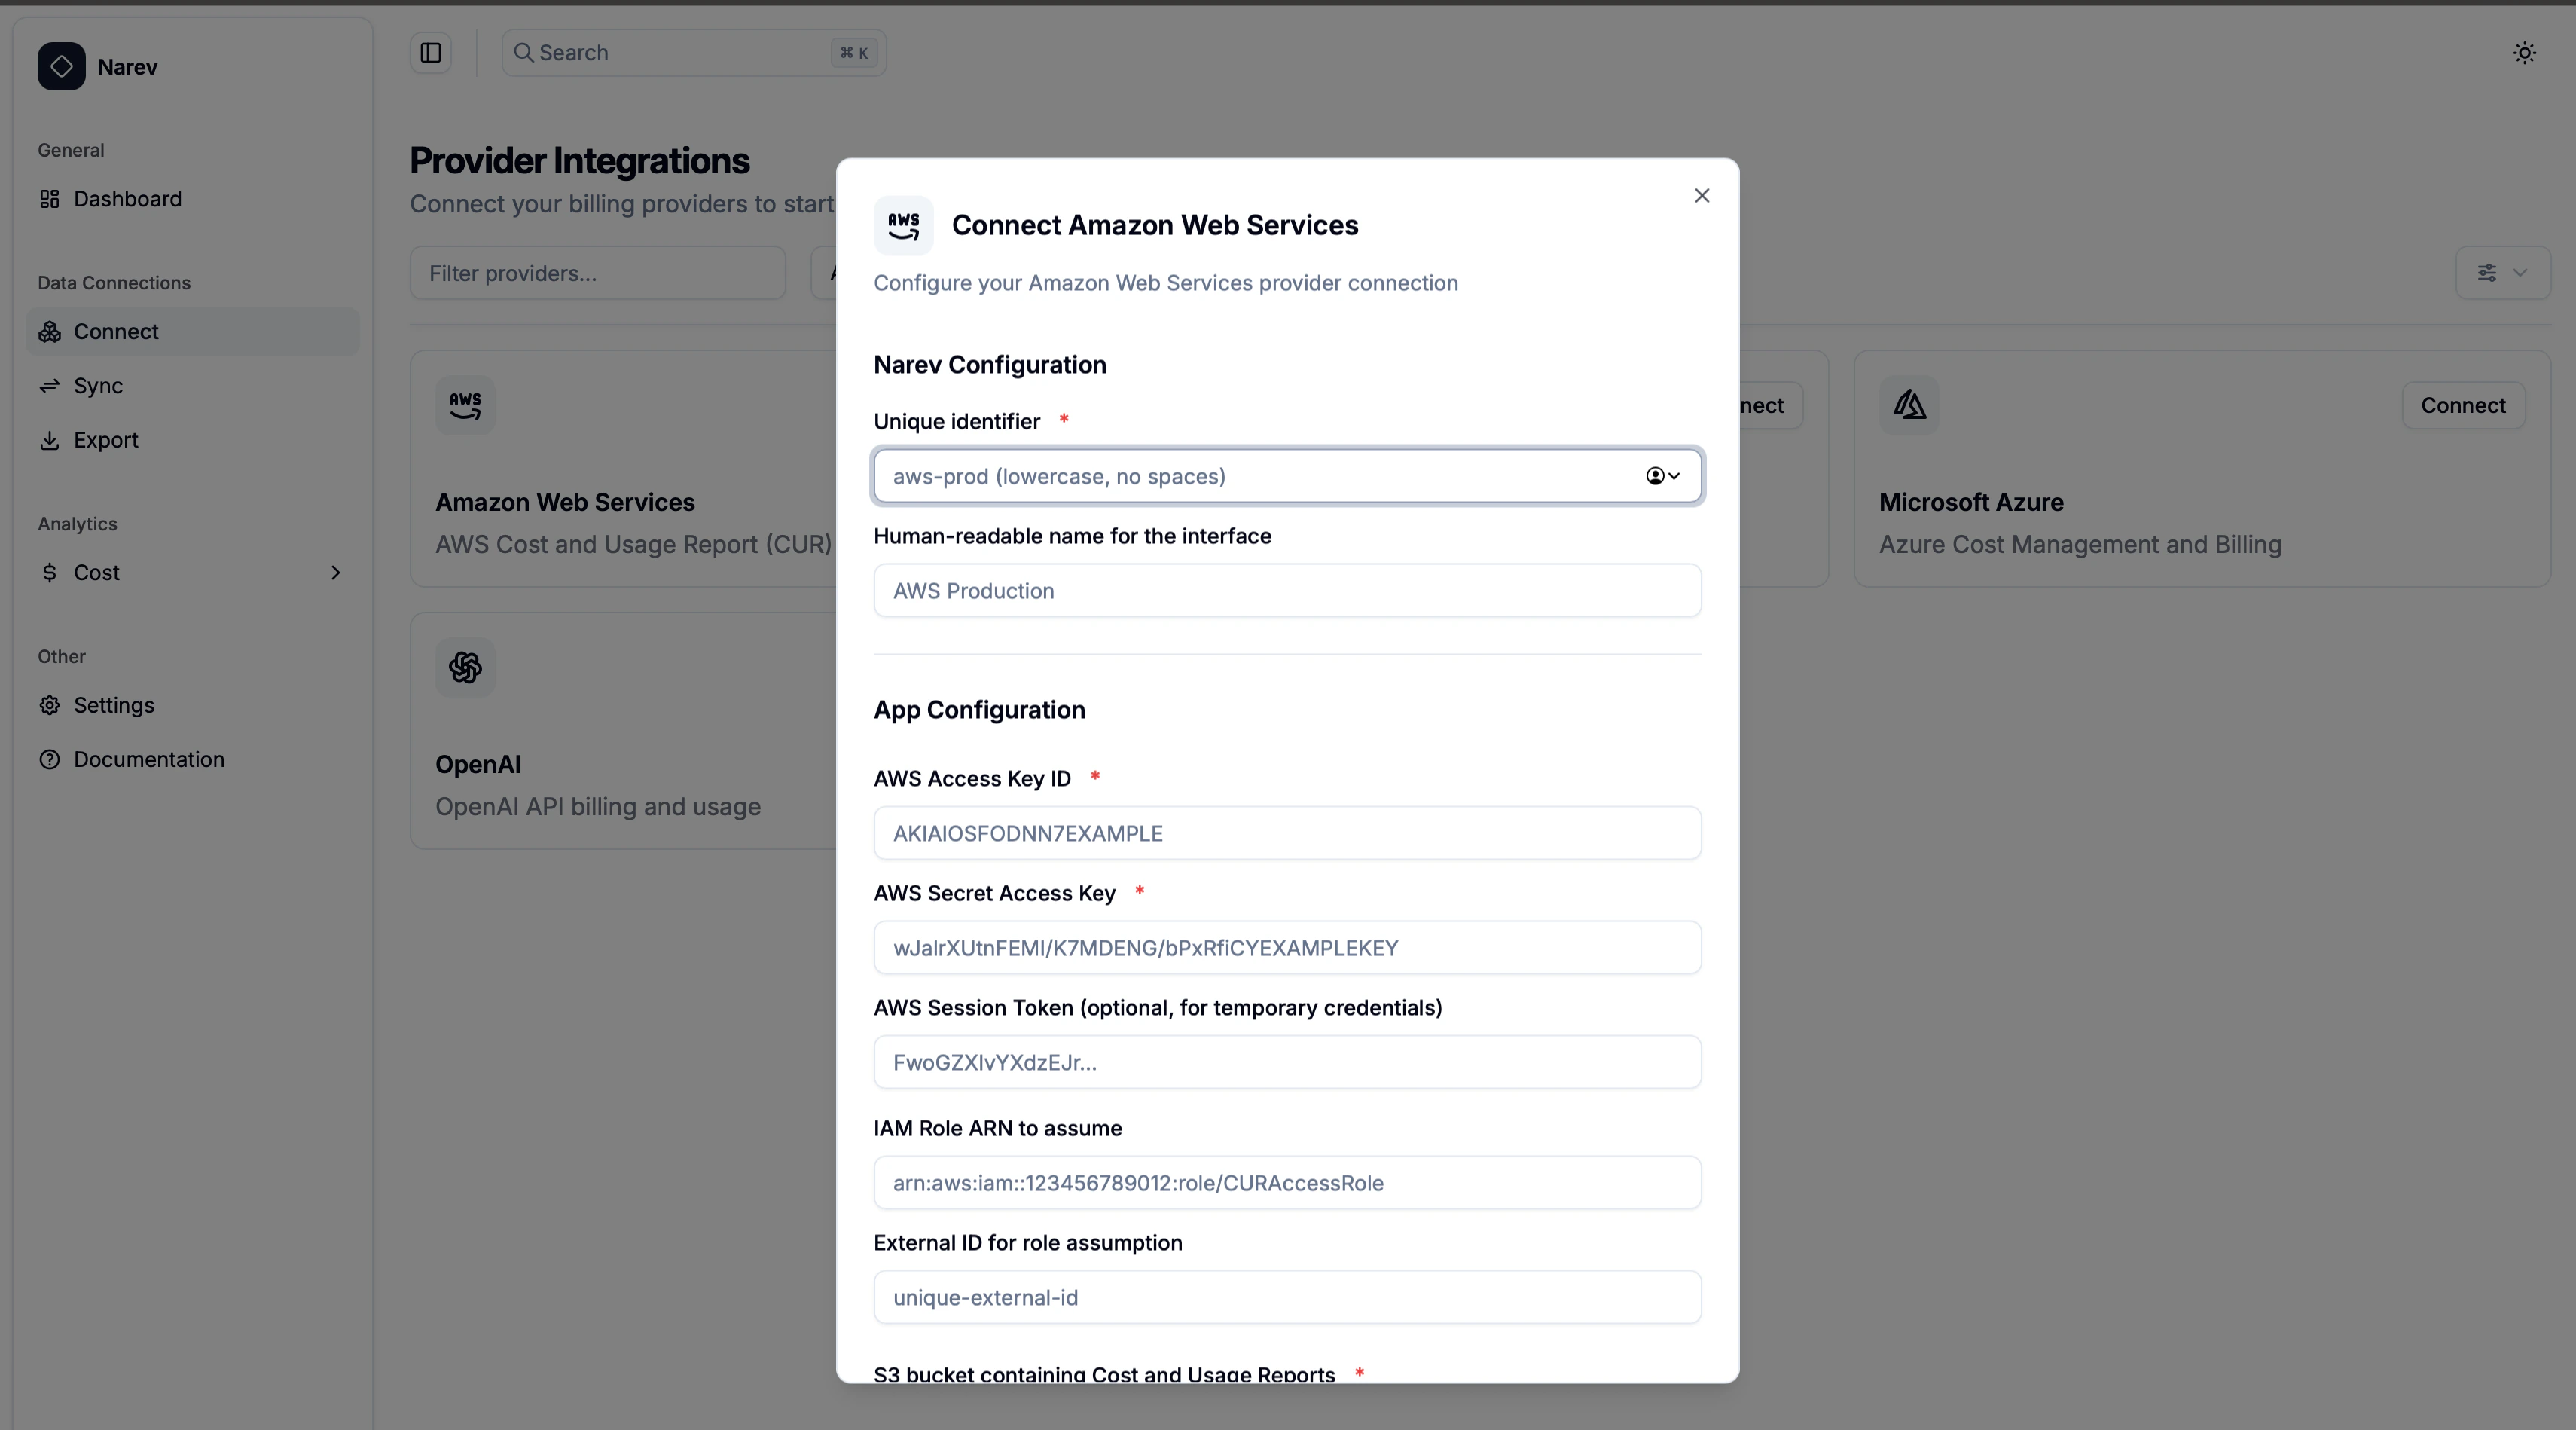 ### Step 3: Configure AWS Provider
#### Narev configuration
**Provider Name** ✅ *Required*
* Unique identifier (for example, `aws-prod`, `company-aws`)
* Format: lowercase letters, numbers, hyphens, underscores only
**Display Name** (Optional)
* Human-readable name (for example, `AWS Production`, `Company AWS`)
* Shown in the interface
#### App configuration - AWS credentials ✅ *Required*
**Access Key ID** ✅
* Your AWS access key (format: `AKIAIOSFODNN7EXAMPLE`)
**Secret Access Key** ✅
* Your AWS secret key (format: `wJalrXUtnFEMI/K7MDENG...`)
* Password field with show/hide toggle
**Session Token** (Optional)
* For temporary credentials (format: `FwoGZXIvYXdzEJr...`)
* Leave empty for permanent keys
#### IAM Role (Optional)
**Role ARN**
* Cross-account role (format: `arn:aws:iam::123456789012:role/YourRoleName`)
**External ID**
* Additional security (for example, `your-unique-external-id`)
#### Provider-specific configuration
**Bucket Name** ✅ *Required*
* S3 bucket with your exports (for example, `narevfocusexport`)
* Must match the bucket you configured in AWS Data Exports
**Report Name** ✅ *Required*
* Export name from AWS (for example, `FocusExport`, `MyCostExport`)
* Must match exactly what you named your export in AWS
**Report Prefix** ✅ *Required*
* S3 prefix from AWS Data Export (for example, `focus/`, `cur/`, `billing/`)
* Must match exactly what you specified when creating the export in AWS
**Region** ✅ *Required*
* Dropdown selection:
* US East (N. Virginia) - us-east-1
* US West (Oregon) - us-west-2
* EU (Ireland) - eu-west-1
* EU (Frankfurt) - eu-central-1
* Asia Pacific (Singapore) - ap-southeast-1
* Asia Pacific (Tokyo) - ap-northeast-1
### Step 4: Connect Provider
1. Review all configuration settings
2. Click the **Connect** button
3. NarevAI tests the connection to your AWS S3 bucket
4. If successful, NarevAI adds the provider and marks it as "Connected"
5. You can now sync billing data from this AWS account
**Connection Test includes:**
* AWS credentials validation
* S3 bucket access verification
* Export files detection
* Permissions check
## Configuration examples
### Basic setup with FOCUS export
```text theme={null}
Provider Name: aws-main
Display Name: Main AWS Account
Access Key ID: AKIAIOSFODNN7EXAMPLE
Secret Access Key: wJalrXUtnFEMI/K7MDENG/bPxRfiCYEXAMPLEKEY
Bucket Name: narevfocusexport
Report Name: MyCostExport
Report Prefix: focus
Region: eu-west-1
```
### Cross-Account Access with IAM Role
```text theme={null}
Provider Name: aws-client-account
Display Name: Client AWS Account
Access Key ID: AKIAIOSFODNN7EXAMPLE
Secret Access Key: wJalrXUtnFEMI/K7MDENG/bPxRfiCYEXAMPLEKEY
Role ARN: arn:aws:iam::123456789012:role/CURAccessRole
External ID: unique-external-identifier
Bucket Name: client-export-bucket
Report Name: ClientCostExport
Region: us-west-2
```
### Legacy CUR Export Setup
```text theme={null}
Provider Name: aws-legacy
Display Name: AWS Legacy CUR
Access Key ID: AKIAIOSFODNN7EXAMPLE
Secret Access Key: wJalrXUtnFEMI/K7MDENG/bPxRfiCYEXAMPLEKEY
Bucket Name: company-billing-reports
Report Name: detailed-billing-report
Region: us-east-1
```
### Common Test Results
#### Success Response
```text theme={null}
Successfully connected to AWS S3
Bucket: narevfocusexport
Report Name: MyCostExport
Region: eu-west-1
Objects Found: 245
Role Assumed: true
```
#### Access Denied
```text theme={null}
AWS connection failed: AccessDenied
```
* Solution: Verify your credentials have S3 permissions for the specified bucket
#### Bucket Not Found
```text theme={null}
AWS connection failed: NoSuchBucket
```
* Solution: Check the bucket name spelling and ensure it exists in the specified region
#### Invalid Credentials
```text theme={null}
AWS connection failed: InvalidAccessKeyId
```
* Solution: Verify your Access Key ID and Secret Access Key are correct
## Supported Features
The AWS provider supports:
* ✅ Cost and Usage Report (CUR) data
* ✅ FOCUS 1.0 format (recommended)
* ✅ Legacy CUR format
* ✅ Detailed billing information
* ✅ Resource tags analysis
* ✅ Cost allocation tags
* ✅ Savings Plans data
* ✅ Reserved Instances information
* ✅ Cost optimization recommendations
* ✅ Carbon emissions data
* ✅ Cross-account access via IAM roles
## Troubleshooting
### Permission Issues
* Ensure your AWS credentials have `s3:GetObject`, `s3:ListBucket`, and `s3:GetBucketLocation` permissions
* Verify the S3 bucket policy allows access from your credentials
* Check IAM role trust relationships if using cross-account access
### Export Configuration Issues
* Verify your Data Export is actively generating files
* Check that the export includes the data types you need (FOCUS 1.0 recommended)
* Ensure the S3 bucket and prefix match your export delivery settings
* Confirm the export name matches exactly (case-sensitive)
### Authentication Failures
* For access keys: Verify they are active and not expired
* For IAM roles: Check the role ARN format and trust relationships
* For temporary credentials: Ensure session tokens are current
### Regional Issues
* Verify the S3 bucket exists in the specified region
* Some AWS services require specific regional configurations
* Cross-region access may have additional latency
### No Data Found
* Check if export files exist in the specified S3 path
* Verify the export name matches exactly (case-sensitive)
* Ensure your billing period has completed for data to be available
* For new exports, wait 24 hours for the first data to be generated
## Data Collection
Once configured, the AWS provider will collect:
* Usage metrics: Service usage, resource hours, data transfer
* Cost data: On-demand costs, reserved instance savings, spot pricing
* Resource information: Instance types, regions, availability zones
* Tagging data: Cost allocation tags, resource tags for cost attribution
* Time-series data: Daily cost breakdowns and usage patterns
* FOCUS-compliant data: Standardized cost and usage data format
Data collection runs automatically based on your configured schedule and will appear in the NarevAI dashboard after the first successful sync. AWS export data is typically updated once per day with your selected refresh cadence.
### Step 3: Configure AWS Provider
#### Narev configuration
**Provider Name** ✅ *Required*
* Unique identifier (for example, `aws-prod`, `company-aws`)
* Format: lowercase letters, numbers, hyphens, underscores only
**Display Name** (Optional)
* Human-readable name (for example, `AWS Production`, `Company AWS`)
* Shown in the interface
#### App configuration - AWS credentials ✅ *Required*
**Access Key ID** ✅
* Your AWS access key (format: `AKIAIOSFODNN7EXAMPLE`)
**Secret Access Key** ✅
* Your AWS secret key (format: `wJalrXUtnFEMI/K7MDENG...`)
* Password field with show/hide toggle
**Session Token** (Optional)
* For temporary credentials (format: `FwoGZXIvYXdzEJr...`)
* Leave empty for permanent keys
#### IAM Role (Optional)
**Role ARN**
* Cross-account role (format: `arn:aws:iam::123456789012:role/YourRoleName`)
**External ID**
* Additional security (for example, `your-unique-external-id`)
#### Provider-specific configuration
**Bucket Name** ✅ *Required*
* S3 bucket with your exports (for example, `narevfocusexport`)
* Must match the bucket you configured in AWS Data Exports
**Report Name** ✅ *Required*
* Export name from AWS (for example, `FocusExport`, `MyCostExport`)
* Must match exactly what you named your export in AWS
**Report Prefix** ✅ *Required*
* S3 prefix from AWS Data Export (for example, `focus/`, `cur/`, `billing/`)
* Must match exactly what you specified when creating the export in AWS
**Region** ✅ *Required*
* Dropdown selection:
* US East (N. Virginia) - us-east-1
* US West (Oregon) - us-west-2
* EU (Ireland) - eu-west-1
* EU (Frankfurt) - eu-central-1
* Asia Pacific (Singapore) - ap-southeast-1
* Asia Pacific (Tokyo) - ap-northeast-1
### Step 4: Connect Provider
1. Review all configuration settings
2. Click the **Connect** button
3. NarevAI tests the connection to your AWS S3 bucket
4. If successful, NarevAI adds the provider and marks it as "Connected"
5. You can now sync billing data from this AWS account
**Connection Test includes:**
* AWS credentials validation
* S3 bucket access verification
* Export files detection
* Permissions check
## Configuration examples
### Basic setup with FOCUS export
```text theme={null}
Provider Name: aws-main
Display Name: Main AWS Account
Access Key ID: AKIAIOSFODNN7EXAMPLE
Secret Access Key: wJalrXUtnFEMI/K7MDENG/bPxRfiCYEXAMPLEKEY
Bucket Name: narevfocusexport
Report Name: MyCostExport
Report Prefix: focus
Region: eu-west-1
```
### Cross-Account Access with IAM Role
```text theme={null}
Provider Name: aws-client-account
Display Name: Client AWS Account
Access Key ID: AKIAIOSFODNN7EXAMPLE
Secret Access Key: wJalrXUtnFEMI/K7MDENG/bPxRfiCYEXAMPLEKEY
Role ARN: arn:aws:iam::123456789012:role/CURAccessRole
External ID: unique-external-identifier
Bucket Name: client-export-bucket
Report Name: ClientCostExport
Region: us-west-2
```
### Legacy CUR Export Setup
```text theme={null}
Provider Name: aws-legacy
Display Name: AWS Legacy CUR
Access Key ID: AKIAIOSFODNN7EXAMPLE
Secret Access Key: wJalrXUtnFEMI/K7MDENG/bPxRfiCYEXAMPLEKEY
Bucket Name: company-billing-reports
Report Name: detailed-billing-report
Region: us-east-1
```
### Common Test Results
#### Success Response
```text theme={null}
Successfully connected to AWS S3
Bucket: narevfocusexport
Report Name: MyCostExport
Region: eu-west-1
Objects Found: 245
Role Assumed: true
```
#### Access Denied
```text theme={null}
AWS connection failed: AccessDenied
```
* Solution: Verify your credentials have S3 permissions for the specified bucket
#### Bucket Not Found
```text theme={null}
AWS connection failed: NoSuchBucket
```
* Solution: Check the bucket name spelling and ensure it exists in the specified region
#### Invalid Credentials
```text theme={null}
AWS connection failed: InvalidAccessKeyId
```
* Solution: Verify your Access Key ID and Secret Access Key are correct
## Supported Features
The AWS provider supports:
* ✅ Cost and Usage Report (CUR) data
* ✅ FOCUS 1.0 format (recommended)
* ✅ Legacy CUR format
* ✅ Detailed billing information
* ✅ Resource tags analysis
* ✅ Cost allocation tags
* ✅ Savings Plans data
* ✅ Reserved Instances information
* ✅ Cost optimization recommendations
* ✅ Carbon emissions data
* ✅ Cross-account access via IAM roles
## Troubleshooting
### Permission Issues
* Ensure your AWS credentials have `s3:GetObject`, `s3:ListBucket`, and `s3:GetBucketLocation` permissions
* Verify the S3 bucket policy allows access from your credentials
* Check IAM role trust relationships if using cross-account access
### Export Configuration Issues
* Verify your Data Export is actively generating files
* Check that the export includes the data types you need (FOCUS 1.0 recommended)
* Ensure the S3 bucket and prefix match your export delivery settings
* Confirm the export name matches exactly (case-sensitive)
### Authentication Failures
* For access keys: Verify they are active and not expired
* For IAM roles: Check the role ARN format and trust relationships
* For temporary credentials: Ensure session tokens are current
### Regional Issues
* Verify the S3 bucket exists in the specified region
* Some AWS services require specific regional configurations
* Cross-region access may have additional latency
### No Data Found
* Check if export files exist in the specified S3 path
* Verify the export name matches exactly (case-sensitive)
* Ensure your billing period has completed for data to be available
* For new exports, wait 24 hours for the first data to be generated
## Data Collection
Once configured, the AWS provider will collect:
* Usage metrics: Service usage, resource hours, data transfer
* Cost data: On-demand costs, reserved instance savings, spot pricing
* Resource information: Instance types, regions, availability zones
* Tagging data: Cost allocation tags, resource tags for cost attribution
* Time-series data: Daily cost breakdowns and usage patterns
* FOCUS-compliant data: Standardized cost and usage data format
Data collection runs automatically based on your configured schedule and will appear in the NarevAI dashboard after the first successful sync. AWS export data is typically updated once per day with your selected refresh cadence.